Categories
Additional bluNFC Instructions manuals

MySQL

In this section you'll learn how to set up MySQL.

  • First, you will have to download MySQL for Windows. Go to the link below:

    https://dev.mysql.com/downloads/installer/

    Click the “Download” button for the second listing. On the new page, click the “No thanks, just start my download.” link.

  • Open the downloaded file and follow the installation process as showed below.

  • After installation you will be asked to configure the products. First we will configure MySQL Server. Follow the installation process as showed below.

Please remember the password you have inserted in step number 4.

  • Now we will configure MySQL Router. Follow the installation process as showed below.

  • Now we will configure Samples and Examples. Follow the installation process as showed below.

  • On step 2 insert the password you have specified when configuring MySQL Server.

  • Now we will finish the installation. MySQL Workbench will start automatically. Now click on the “Local instance MySQL80” box. Type your password (the one you have specified while configuring your MySQL Server) and click the “OK” button.

  • Click on the “rectangle” icon at the top to resize the window.

  • Now we will create a new database. In order to do it, click the “add database” icon located at the top. In the name field type the name of the database. Click the “Apply” button. A new window should pop up.

  • On this new window click the “Apply” button. Click the “Finish” button. Inside an “Output” window you should see a message that the action was executed successfully.

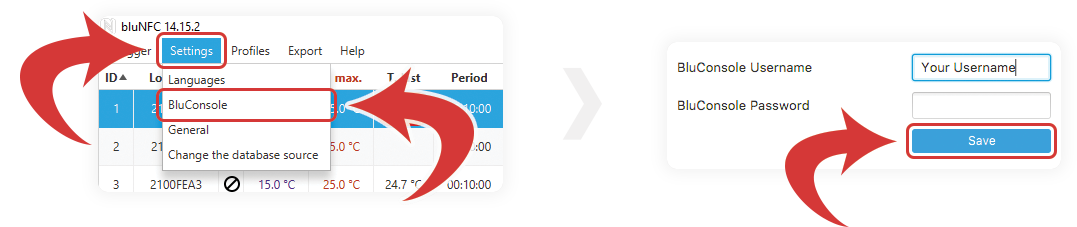
  • Now let’s go back to the bluNFC. Insert correct database information and click the “Test the connection” button. You should see a green “Valid” text appearing near the button. Now click on the “Save” button.

For a database name insert the name you have set up during the process of setting up a database in MySQL Workbench.

For a password insert the password you have specified when configuring MySQL Server.

For other information insert:
Host: localhost
Port: 3306
Username: root

  • A new window should pop up where you will be asked to insert your login information. Insert your login and password and click on the “Login” button.

Use these login details:

Login: admin
Password: adminpass123

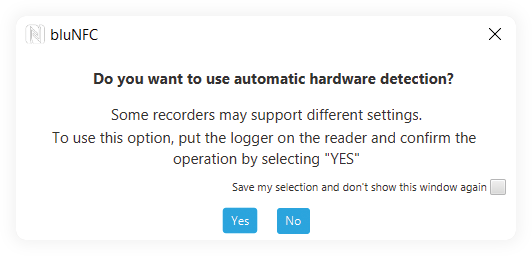
  • In order to change your email or password (as a user you can only change password), first close the “What do You want to do?” window. Now go to the top menu, select “Settings” and “Change account details”.

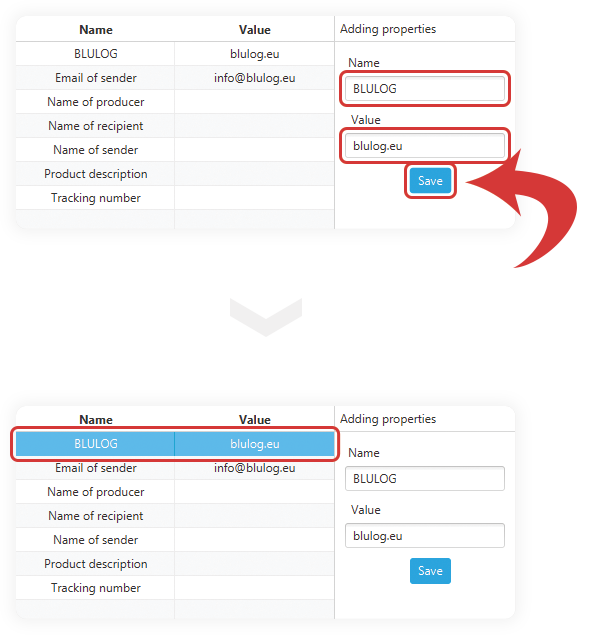
  • A new window should pop up. On this window insert your login information and click the “Authorization” button. Now insert your new email and/or password and click the “Save” button. You should receive a message that the account details were saved.

It is important to set an email for your account as it is required to have an ability to register new users.

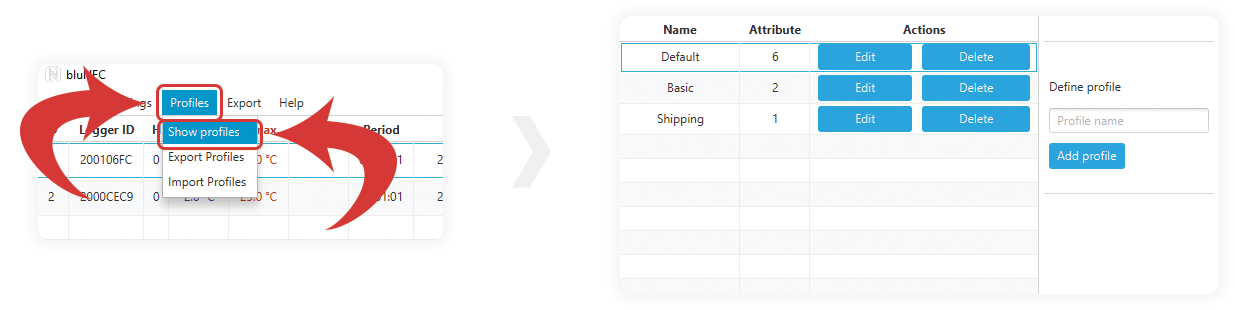
  • If you would like to register a new user as an admin (or create an account as a user), first go to “Settings” and “Logout” at the top menu. A new window should pop up.

  • On this new window click the “Register” link. Now fill up the information. Click the “Register” button. You should receive a message that the account was created successfully.

  • Now you should receive an email with account information and validation code (or an admin will receive it if you are a user).

As an admin you should send an email to your user with the validation code. As a user you should expect such a validation code from the admin to finish the registration.

  • Once you receive an email, go back to bluNFC and login. Enter your validation code and click the “Confirm” button. You should receive a message that the code is correct. Click the “Close” button. Now your registration is complete. Congrats!

You have 2 weeks to complete the registration process. After this time your account will be permanently deleted and you will have to create a new one.

  1. If you forgot the password, click the “Forgot your account details?” link on the login window. A new window should pop up.

  2. On this new window insert your email and click the “Confirm” button.

  3. You should receive a message to check your mailbox. Check your email and look for email with title “bluNFC Reset password”. Inside you should see your reset key. Copy it.

  4. Now click the “I received the key” link and paste your code.

  5. Click the “Confirm” button.

  6. You will be able to change your email and password (or just password if you are the user). Set the new password and click the “Save” button. You should receive a message that the account details were saved.

You have 24 hours to reset the password. After that your code will expire.

Categories
Additional bluNFC Instructions manuals

AAR

In this section you'll learn how to recover AAR.

  1. In order to recover AAR, select “Logger” and “Recover AAR” from the top menu.

  2. A window will open inviting you to place the first logger on the reader. Follow the instructions and wait a few seconds. You can recover AAR for as many loggers in a row as you wish.

  3. After a successful AAR recovery you should be able to see the message “Success – Change logger”.

  4. Once you are finished, just close the window.

Recover AAR allows you to fix a logger in case it was damaged using a different application.

Categories
Additional bluNFC Instructions manuals

Calibration Certificate

In this section you'll learn how download a calibration certificate.

  1. In order to download the calibration certificate, click the “check” icon.

  2. Click the “Yes” button if you would like to use data from the row (that means it will use data that was already saved in the app). If you would like to use data directly from the logger, click the “No” button.

  3. Place the logger on the NFC reader and click the icon again.

  4. Now select where would you like to save the certificate and click on the “Save” button.

Categories
Additional bluNFC Instructions manuals

Remove All Loggers

In this section you'll learn how remove the loggers rows.

  • In order to remove the rows with the logger’s data, select “Logger” and “Remove all loggers” option from the top menu.

Categories
Additional bluNFC Instructions manuals

Settings

In this section you'll learn how to change settings, like language and bluConsole login details.

  • In order to change the settings, select “Settings” from the top menu and choose from “Languages”, “Bluconsole”, “General” or “Change the database source”.

  • Inside “Languages”, you can change the language of the application. You can select “auto”, “polski”, “english” or “français”. Click the “Save” button and then restart the application in order to apply those changes.

  • Inside “Bluconsole”, you can insert your bluConsole login details. Click the “Save” button to apply those changes.

  • Inside “General”, you can configure various settings. Click the “Save” button to apply those changes.

Legend:

Show action screen on start – shows a screen with buttons like “Start new recording” or “Read data” once the application opens

Show user screen on start – shows a screen where you will be able to save your bluConsole login settings once the application opens

Upload after scan as anonymous user – allows to upload data of a scanned logger directly to the cloud without your own bluConsole account

Check the location before reading data – before reading a logger the app will detect a location. Make sure to activate “Upload after scan as anonymous user” or insert your bluConsole login information. One of those needs to be active in order to send data to bluConsole. You will also need a stable internet connection.

Show logger version scan window before start programming – allows to show an automatic hardware detection window as explained in starting a new recording section. If this option will be selected, you will see this window when starting a new recording:

If this option is unselected, the above window will not appear and you will have an option to use automatic detection of the hardware.

If you select “Yes”, a window will not appear and automatic hardware detection will happen in the background.

If you select “No”, a window will not appear and automatic hardware detection will not happen.

  1. Inside the “Change the database source”, you can change the type of database you would like to use and its settings. Once you select it, restart bluNFC.

  2. On a new open you should see a window where you can configure your database.

Categories
Additional bluNFC Instructions manuals

Profiles

In this section you'll learn how to create, edit, delete, import & export a profile.

Create/Edit/Delete

  • In order to access profiles, select “Profiles” from the top menu and select a “Show profiles” option. A new window should pop up where you will have more options.

A profile is a combination of properties that you want to keep in the memory in order to apply it when starting a new recording for your logger(s).

  • In order to edit a profile, click the “Edit” button. A new window should pop up.

On this new window you will be able to add new properties (which are pre-defined fields and values), delete currently existing properties and change values.

  1. In order to add a new property, fill up the “Name” and “Value” on the right.
  2. Once you are finished, click the “Save” button. Now the new property should appear on the left.
  1. In order to remove a property, select it first.
  2. Then, click the “Delete selected” button.
  1. In order to edit a value in an existing property, double click it.
  2. Now type your new value and press “Enter” on your keyboard.
  1. In order to add a profile, insert your profile name in the “Define profile” section on the right.
  2. Once it is done, click the “Add profile” button.
  • In order to delete a profile, click the “Delete” button.

Import/Export

  1. In order to import profiles, select “Profiles” from the top menu and select an “Import Profiles” option. A new window should pop up.
  2. On this new window you can locate your profile’s file.
  3. Once you have selected it, click the “Open” button. After a successful import you should be able to see a message at a bottom stating “Data importing correct”.
  1. In order to export profiles, select “Profiles” from the top menu and select an “Export Profiles” option. A new window should pop up.

  2. On this new window you can specify where would you like to save the profiles.

  3. Once you have selected it, click the “Save” button.  After a successful export you should be able to see a message at a bottom stating “Data exporting correct”.

Categories
Additional bluNFC Instructions manuals

Hidden Columns

In this section you'll learn how to show hidden columns.

Number of set/read measurements

  • In order to show a column with number of set/read measurements, click the “loop” icon located at the right. Click it again to hide the column.

bluNFC will count how many measurements should be stored in logger memory and how many measurements have been read.

You can easily check when any errors occur, because if the showing numbers do not match to each other, it means that something went wrong.

For example 1000/5133 shows you that you should expect 5133 of measurements read from memory but the system reads only 1000.

Number of measurements stored in database

  • In order to show a column with number of measurements stored in database, click the “database” icon located at the right. Click it again to hide the column.

Last reading’s date & time

  • In order to show a column with the last reading’s date and time, click the “watch” icon located at the right. Click it again to hide the column.

RTC time

  • In order to show a column with RTC time, click the “timer” icon located at the right. Click it again to hide the column.

RTC time shows the time of the CPU.

Categories
Additional bluMobile Instructions manuals

Settings

In this section you'll learn how to find settings.

  1. In order to access settings, first make sure you are inside a main dashboard page. Tap on the “3 dots” icon located at the top right.

  2. Select “Settings”.

Inside you will be able to change the temperature unit and show/hide inactive loggers.

Categories
Additional bluMobile Instructions manuals

Full Screen

In this section you'll learn how to activate a full screen mode.

  1. In order to activate a full screen mode, first make sure you are on the main dashboard. Now, tap on the “3 dots” icon located at the top right.

  2. Select “Full screen” from the list. A top bar should disappear.

  • To quit the full screen mode, tap on the “2 arrows” button located at the bottom right.

Categories
Additional bluMobile Instructions manuals

Preferences

In this section you'll learn how to change your preferences.

  1. In order to change your preferences, first make sure you are on the main dashboard. Now, tap on the “3 dots” icon located at the top right and select “Change preferences” from the list.

  2. You can filter your loggers based on your organization name, hub ID or a car plate number. Once you have inserted your values, press the “Continue” button.

Make sure your car plate number or hub ID is in big capitals and starts with the “#” sign.

Categories
Additional bluMobile Instructions manuals

Pin

In this section you'll learn how to pin selected loggers so they stay at the top.

Pin selected loggers

  1. In order to pin your selected loggers, just hold any logger for a moment.

  2. After a while you will see checkboxes appearing inside the logger boxes. Tap the loggers you would like to select.

  3. Now, tap the “Pin selected loggers” button. The selected loggers should appear at the very top of the list (with an exclamation mark). Well done!

Unpin selected loggers

  1. In order to unpin your loggers, just hold any logger for a moment.
  2. After a while you will see checkboxes appearing inside the logger boxes. Tap the loggers you would like to unpin.

  3. Now, tap the “Pin selected loggers” button. The unselected loggers should appear at the default order.

Categories
Additional bluMobile Instructions manuals

Settings

In this section you'll learn how to access settings.

  1. In order to access settings, first make sure you are inside a main dashboard page. Tap on the “3 dots” icon located at the top right.

  2. Select “Settings”.

Inside “Settings” you will be able to change the temperature unit, show/hide inactive loggers and play an alarm sound on breach out.