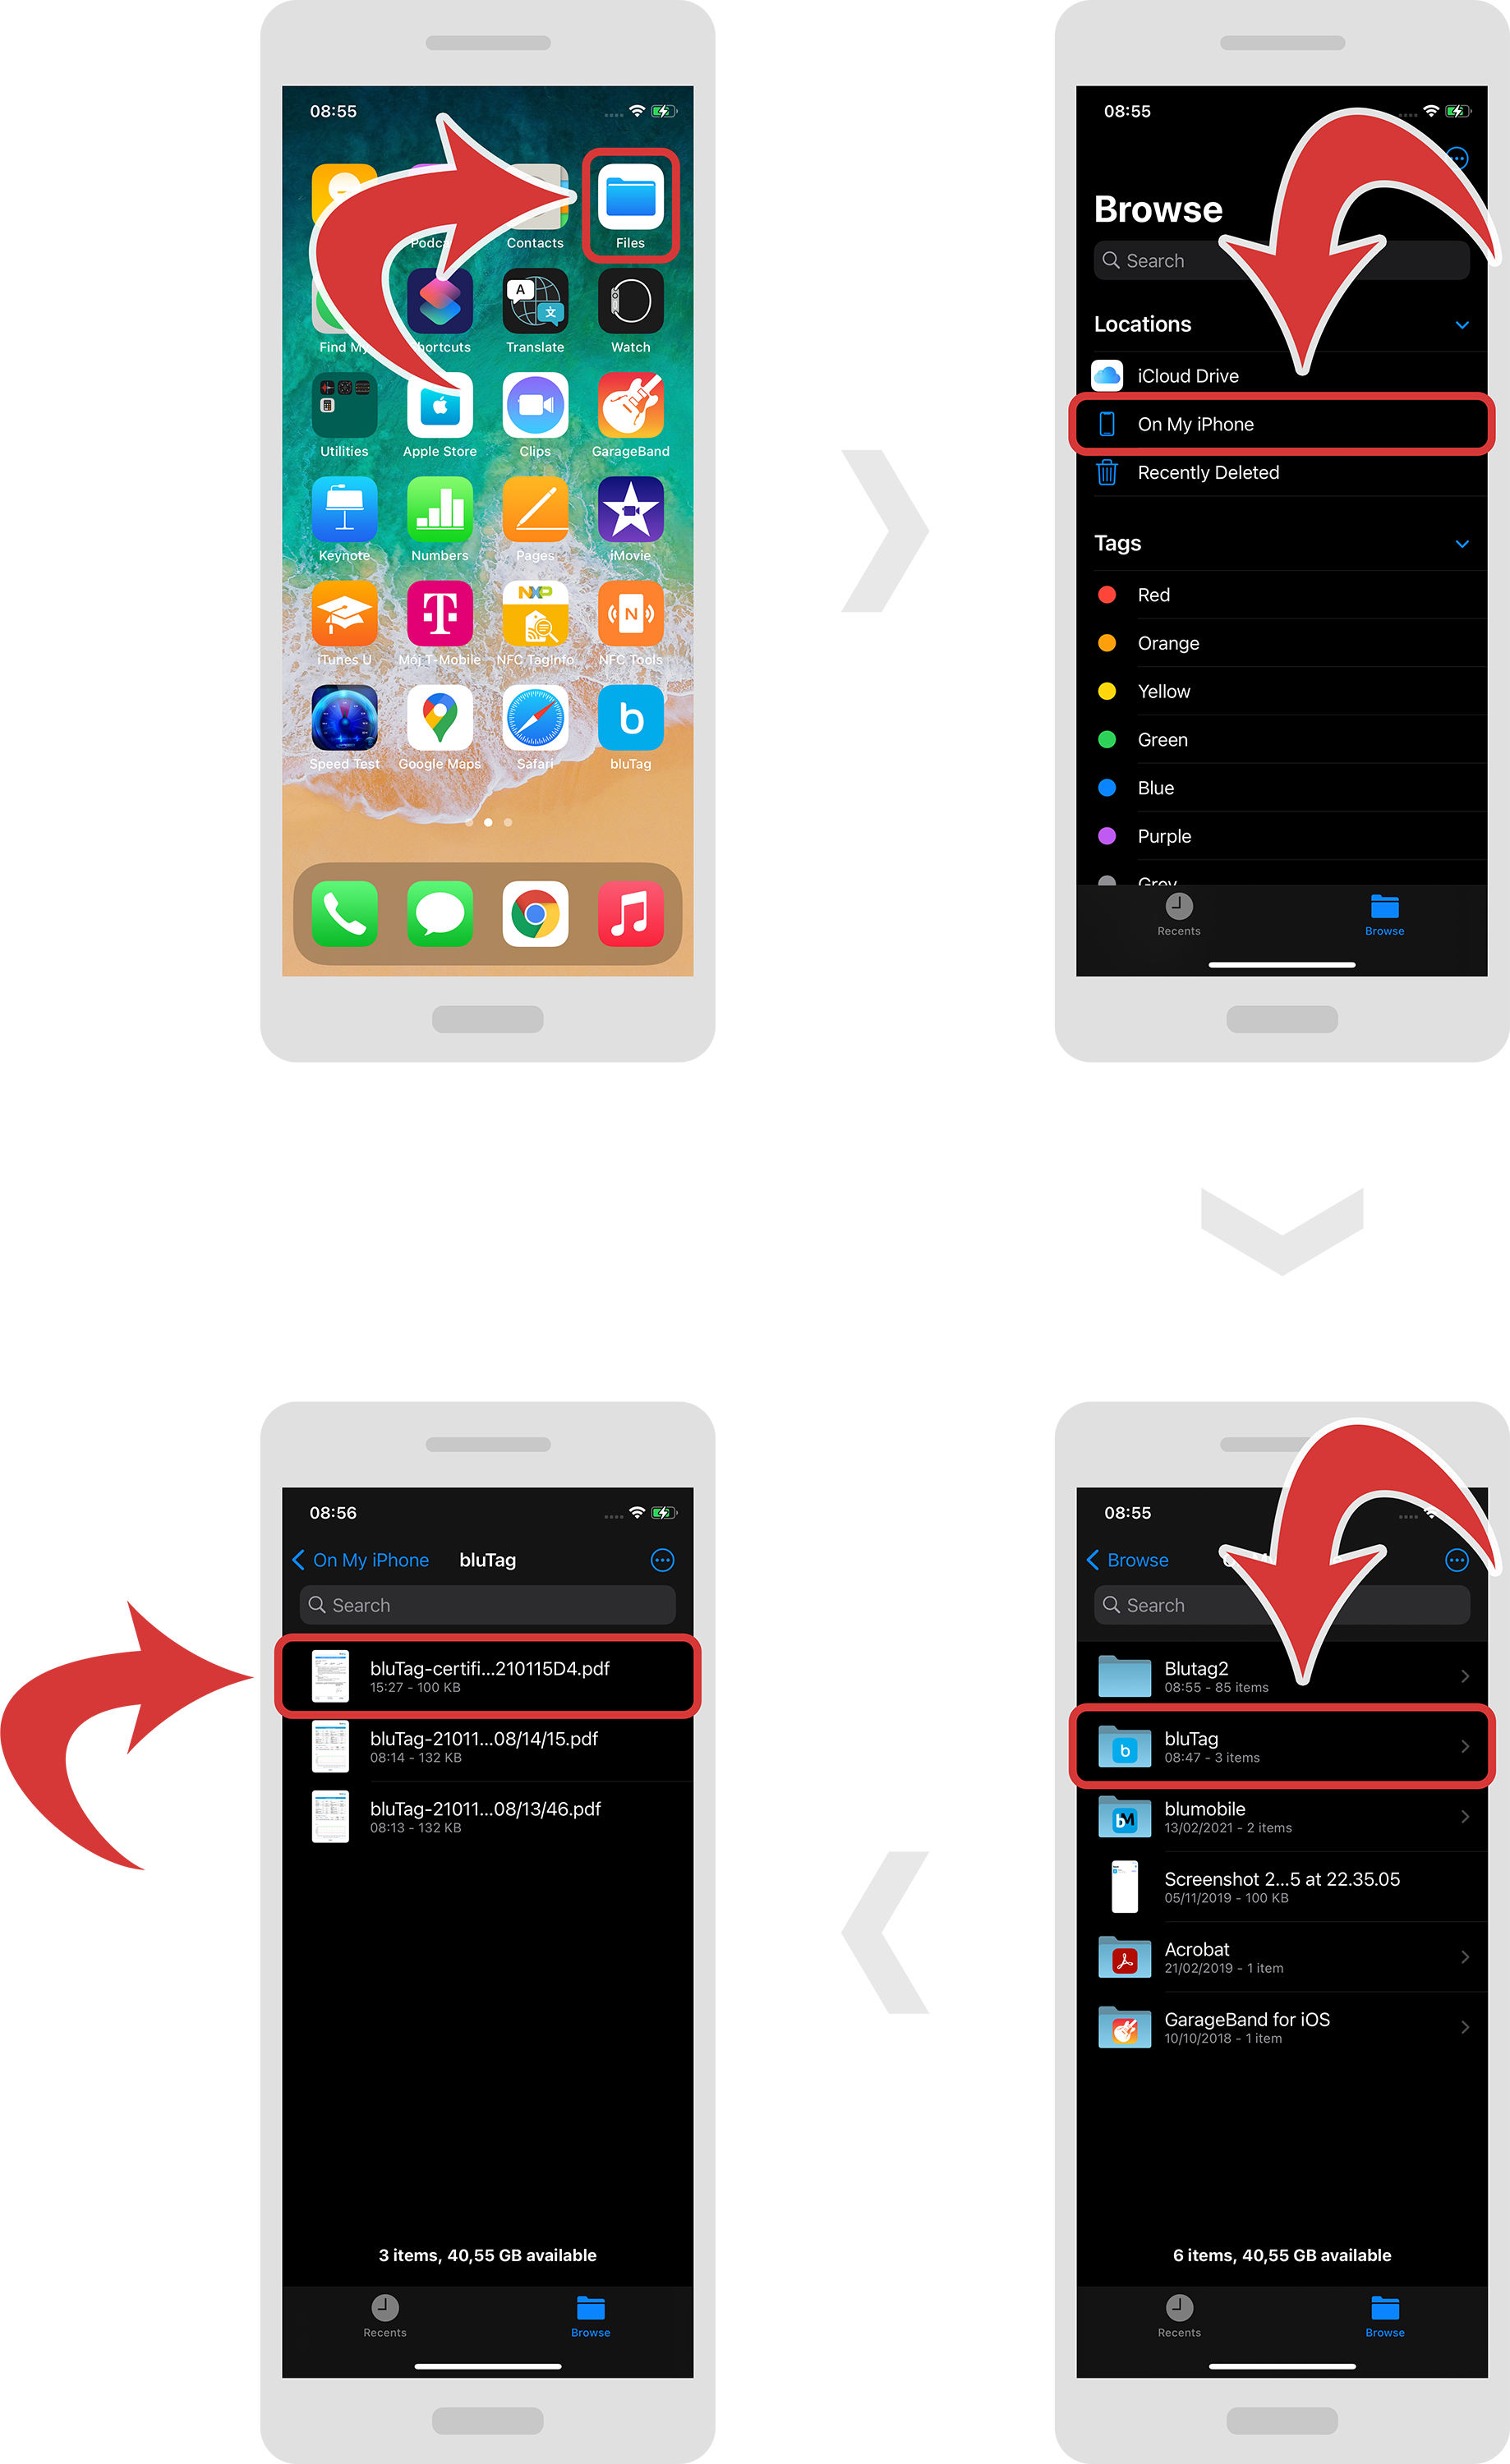
In order to download a calibration certificate, first make sure you are inside a “Data Dashboard” page.
Now, press on the “3 dots” icon on the top right.
Select “Certificate” from the drop down menu.
A new loading window should pop up. After it is finished a “PDF downloaded” window should appear. Tap on the “Ok” button.

Go to “Files”, “On My iPhone” and “bluTag” to access your certificate.
Tag: Additional
Categories
Settings
-
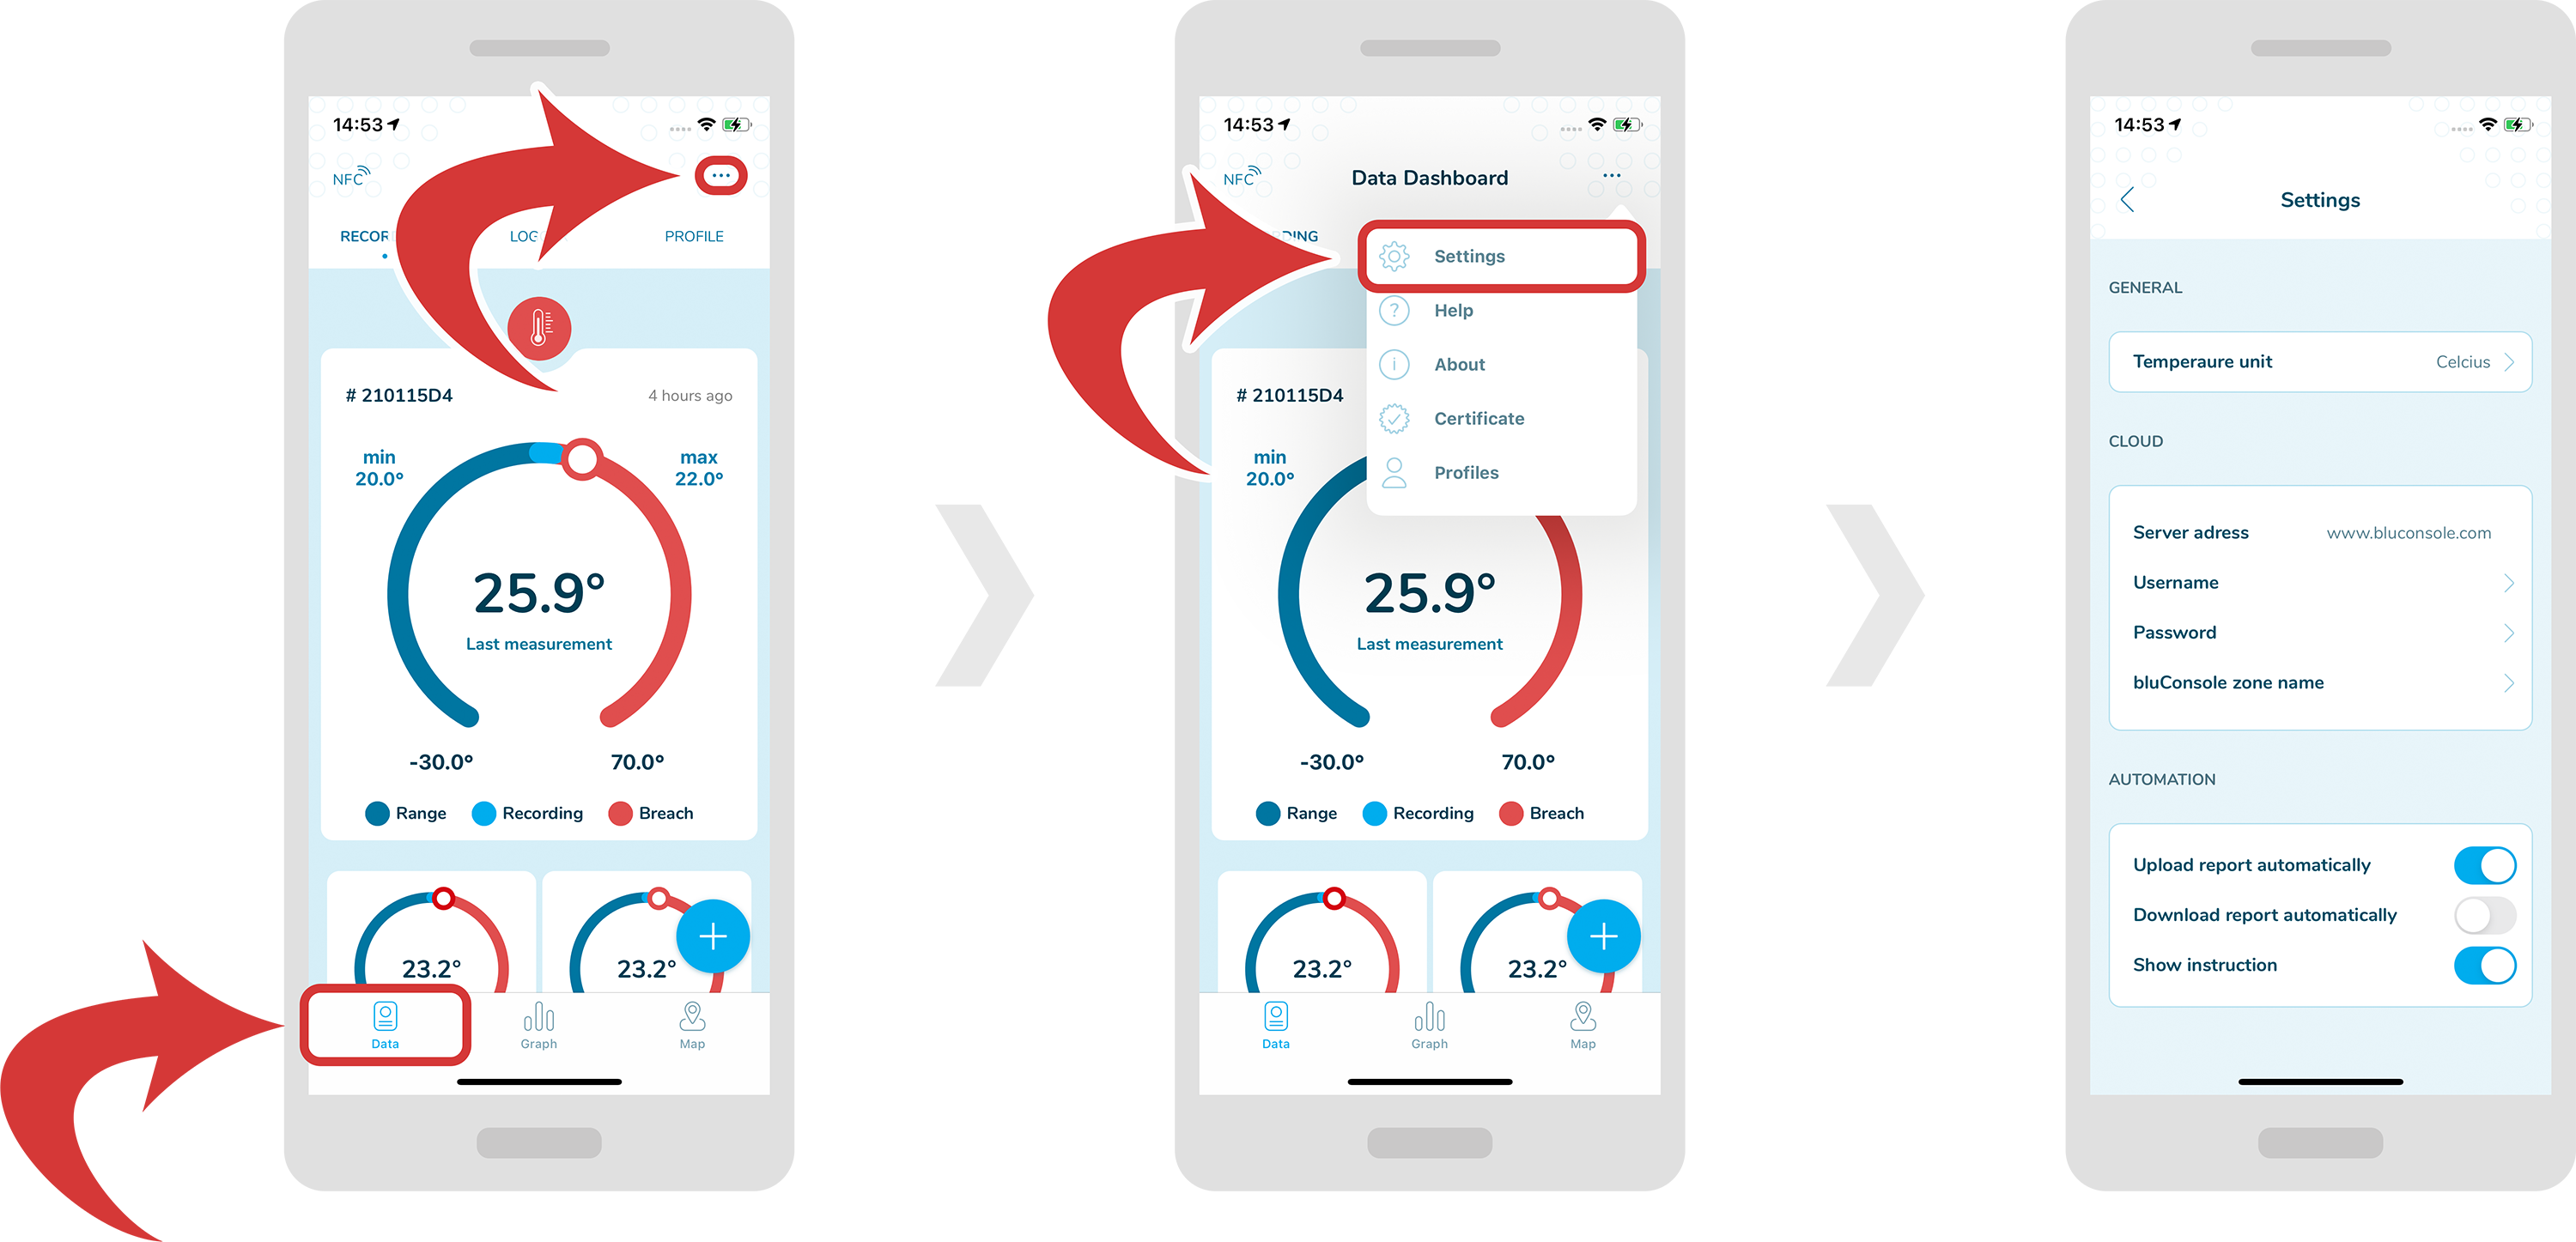
In order to access settings, first make sure you are inside a “Data Dashboard” page.
-
Now, press on the “3 dots” icon at the top right.
-
Select “Settings” from the drop down menu.
Categories
Profiles
Overview
-
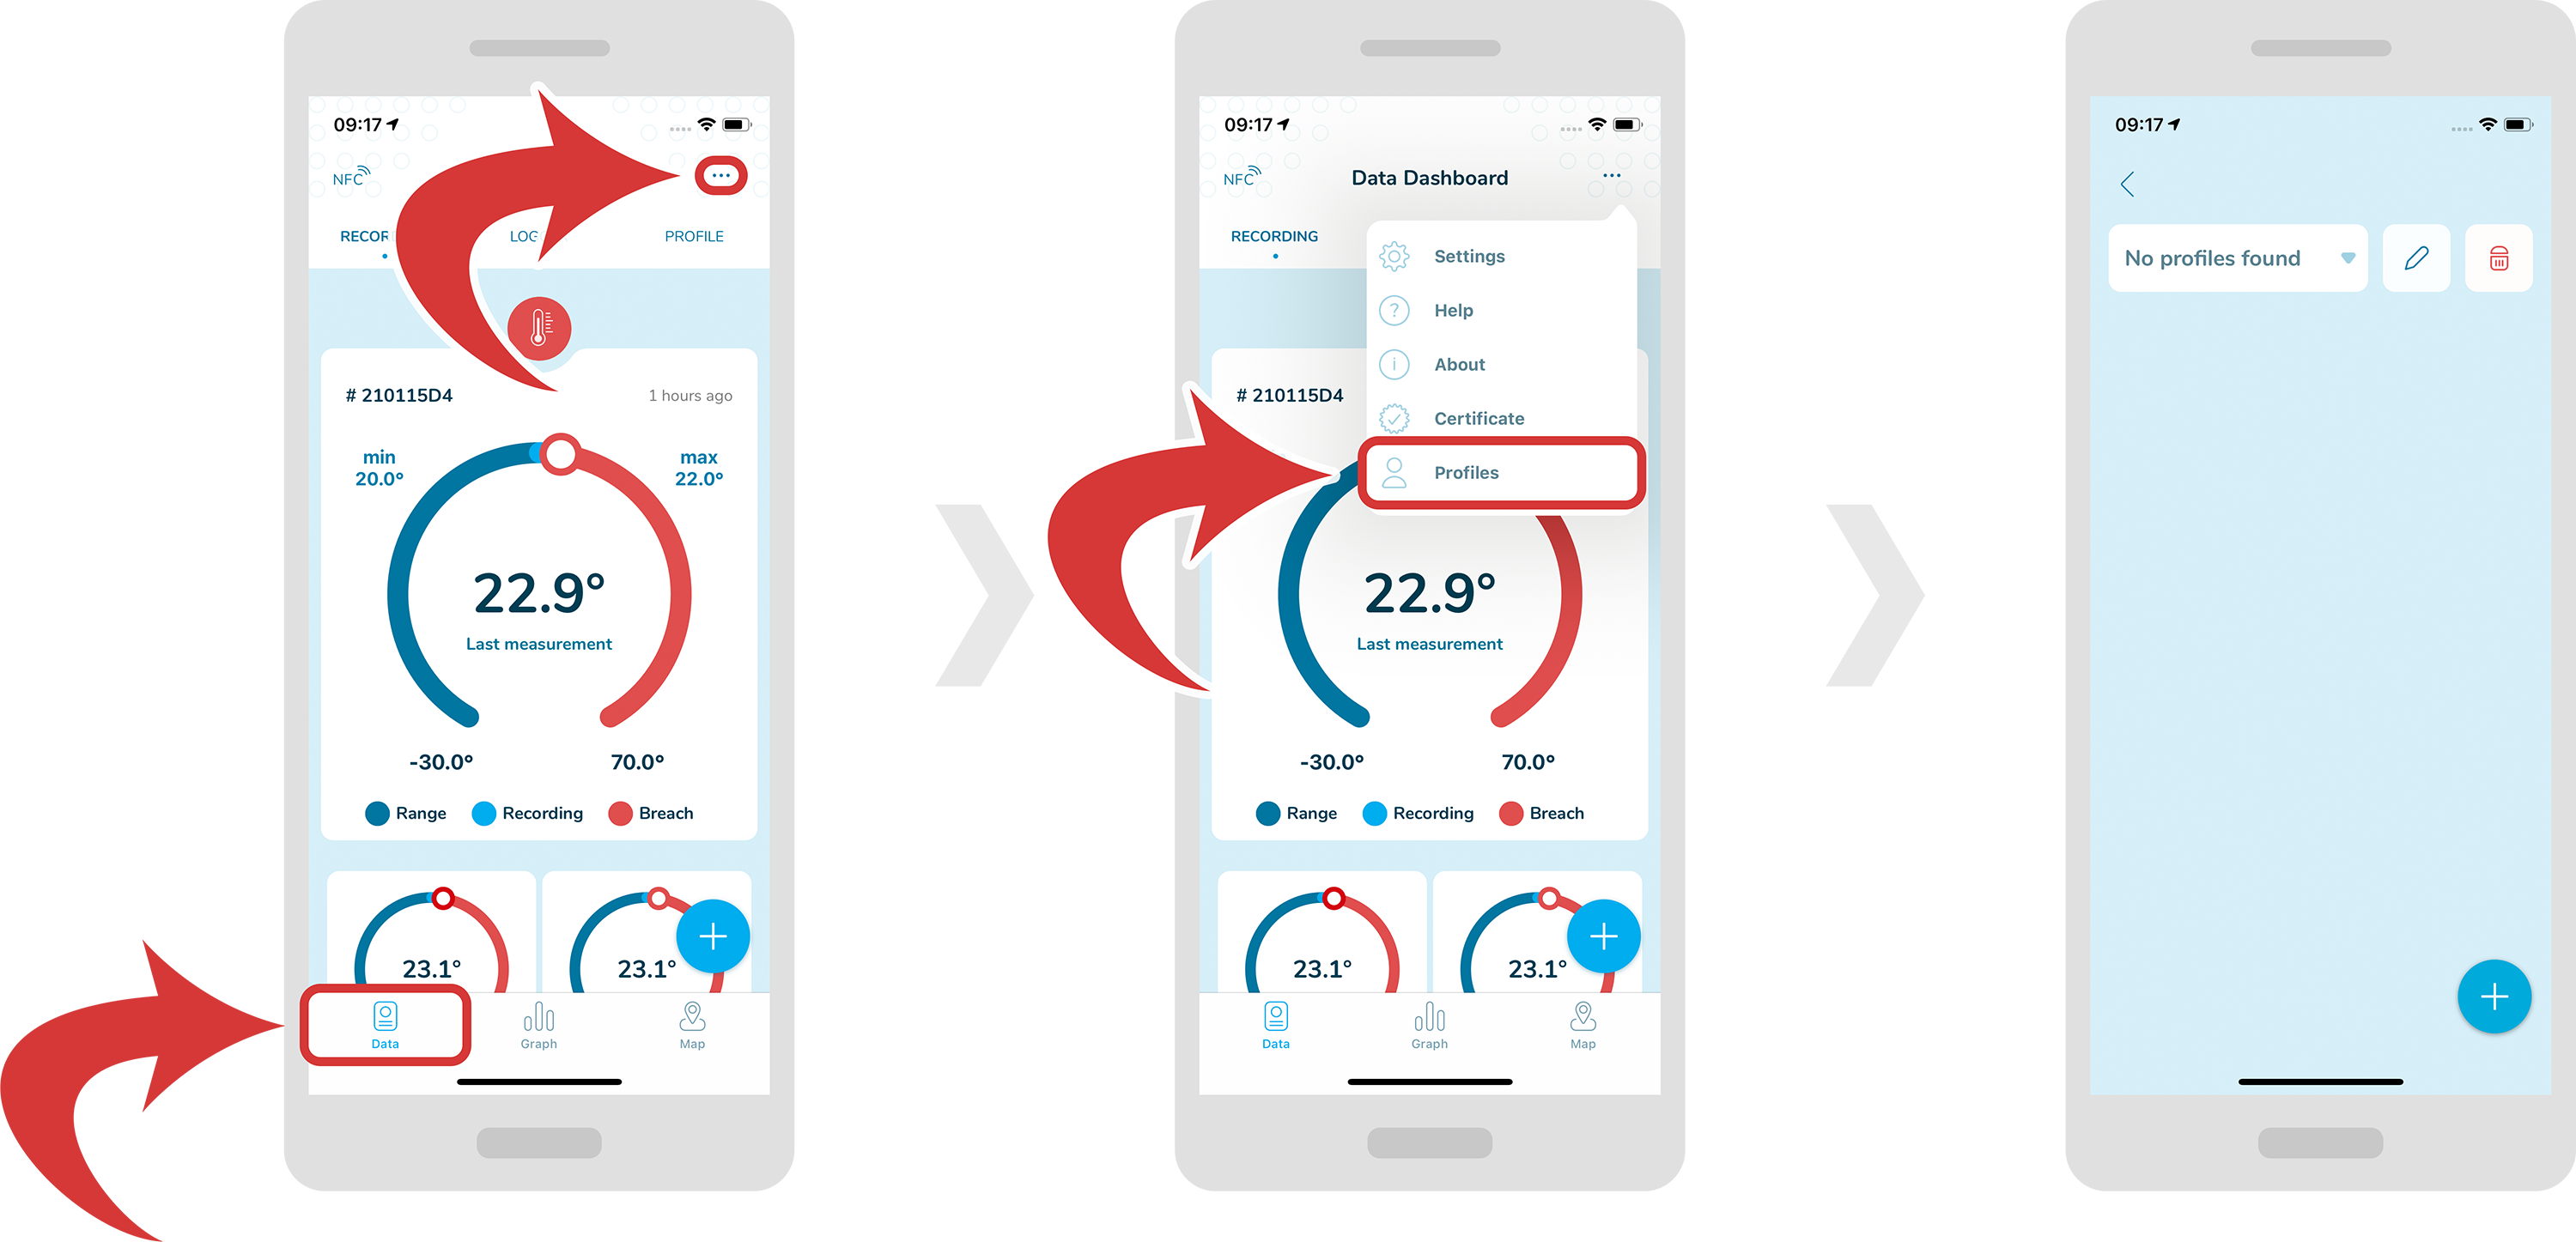
In order to access profiles, first make sure you are inside a “Data Dashboard” page.
-
Now, tap on the “3 dotted” icon at the top right, and select “Profiles”.
-
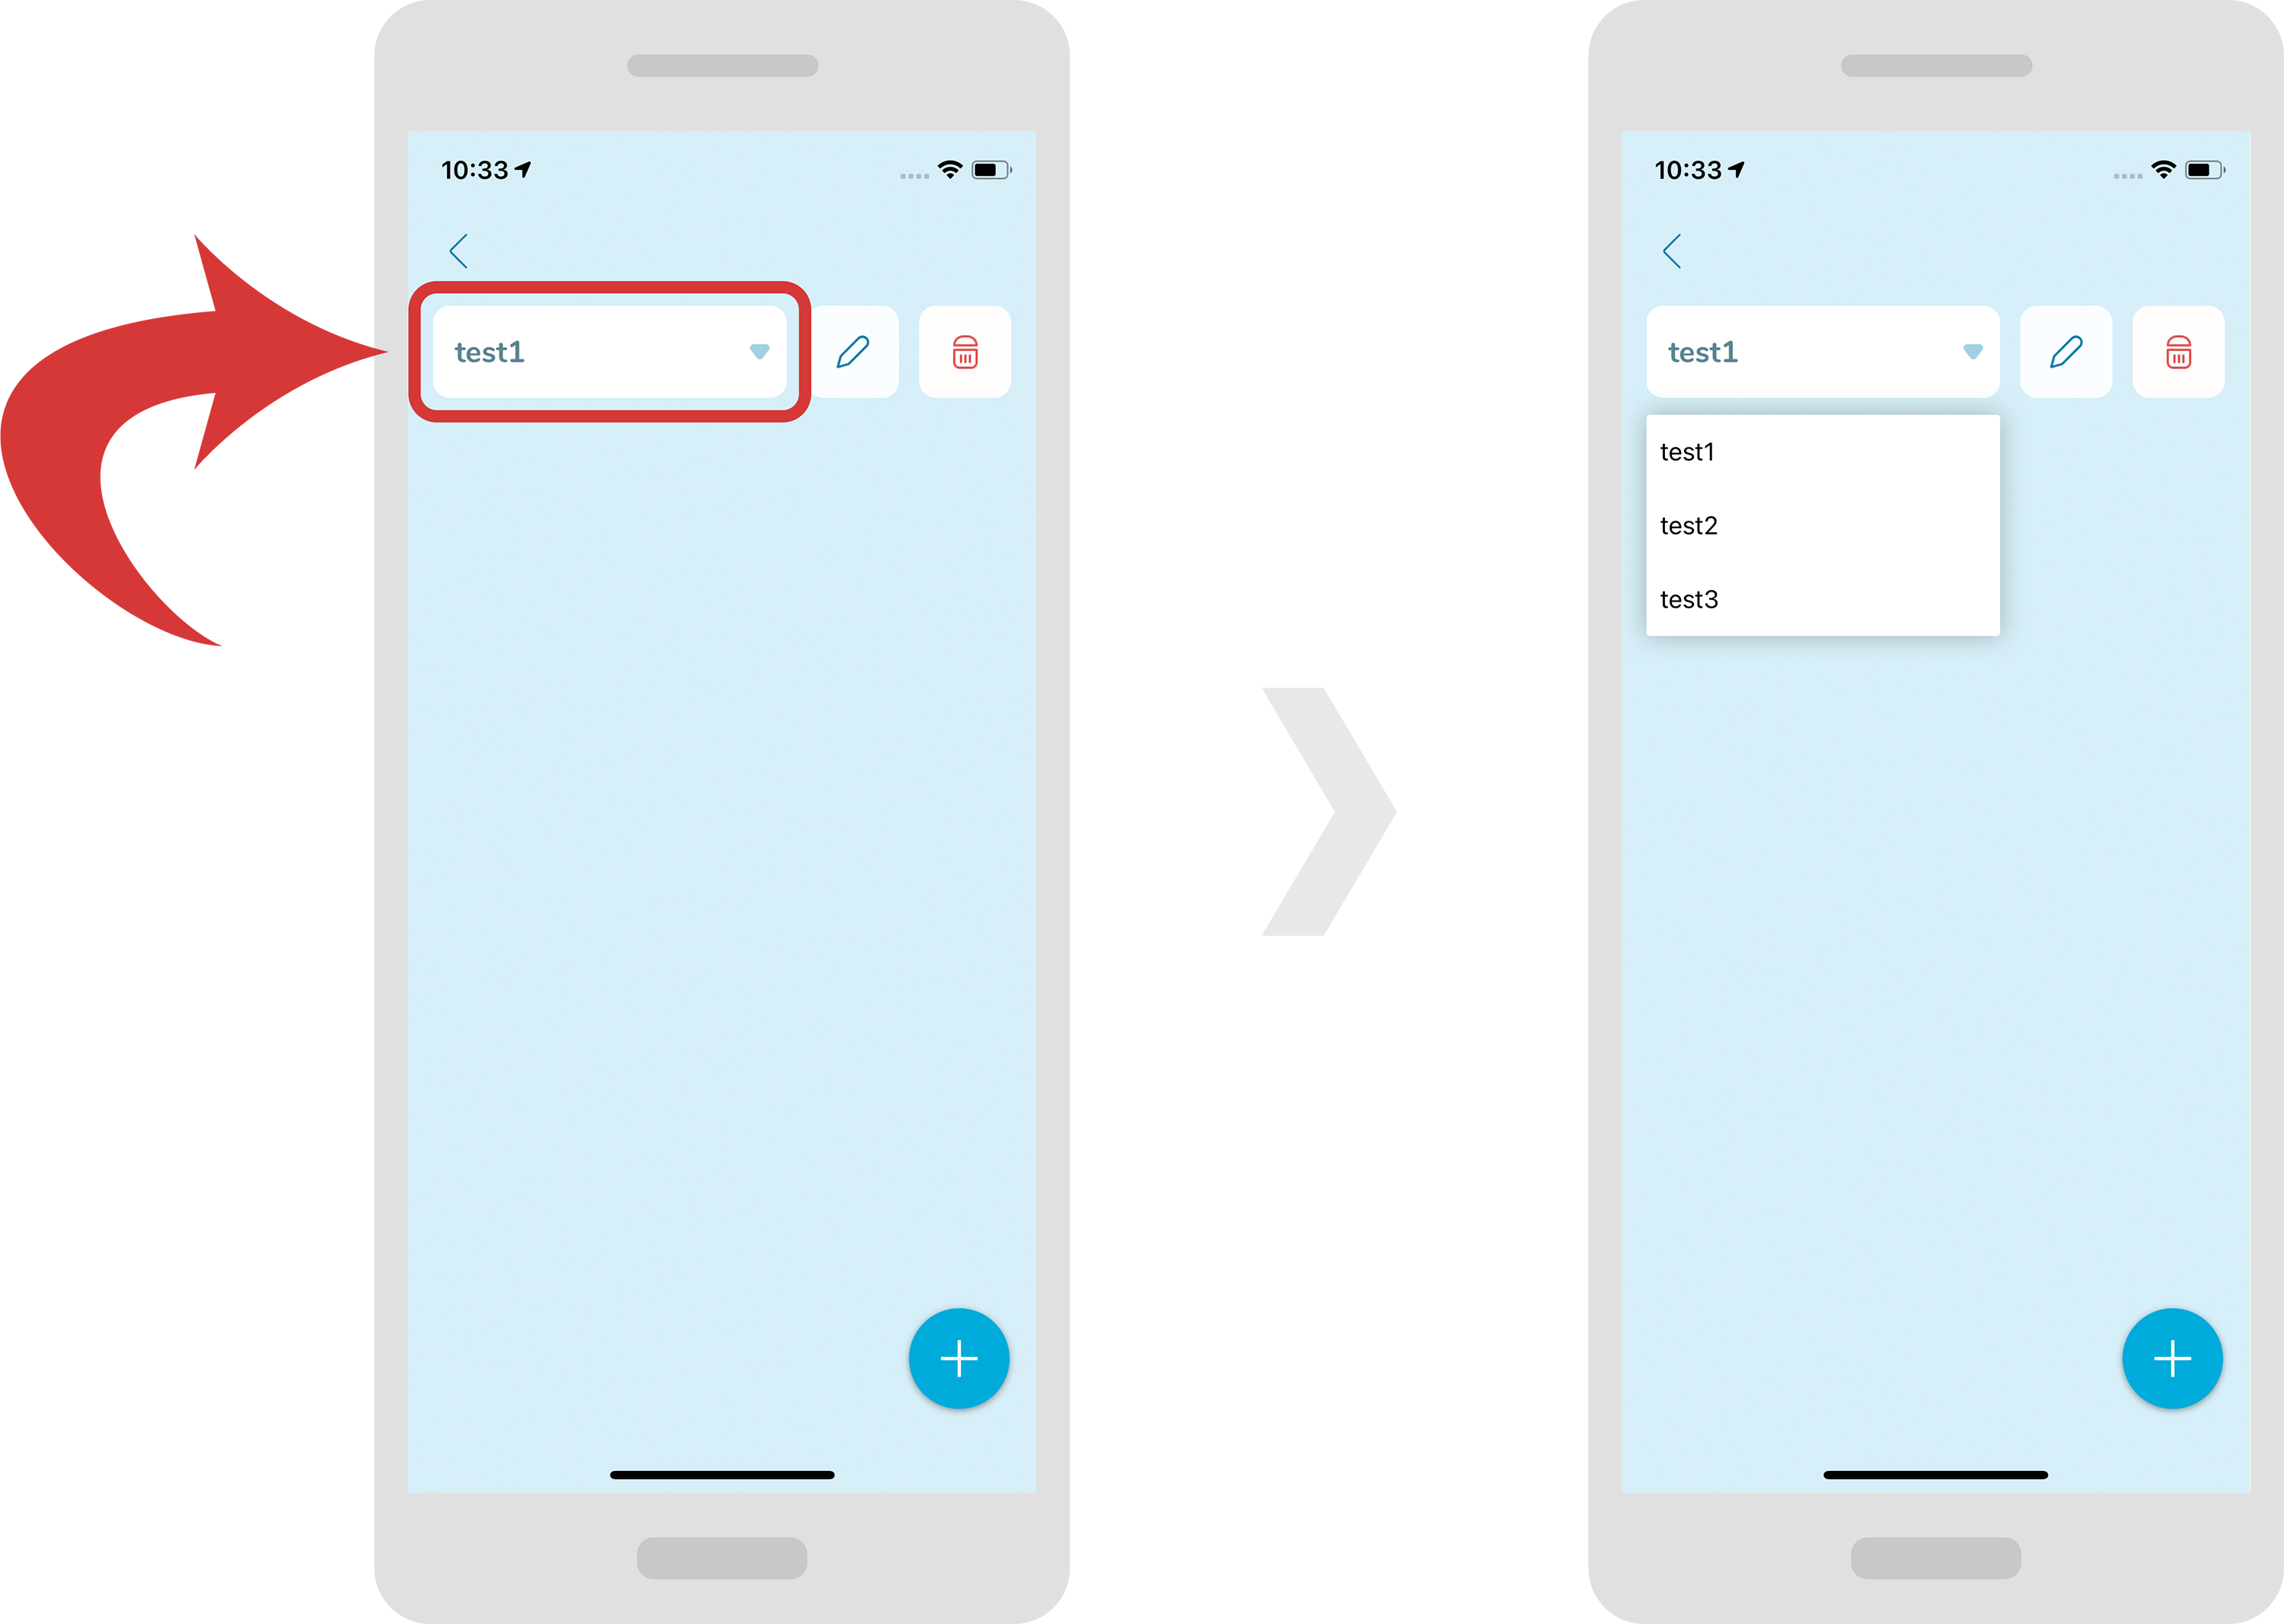
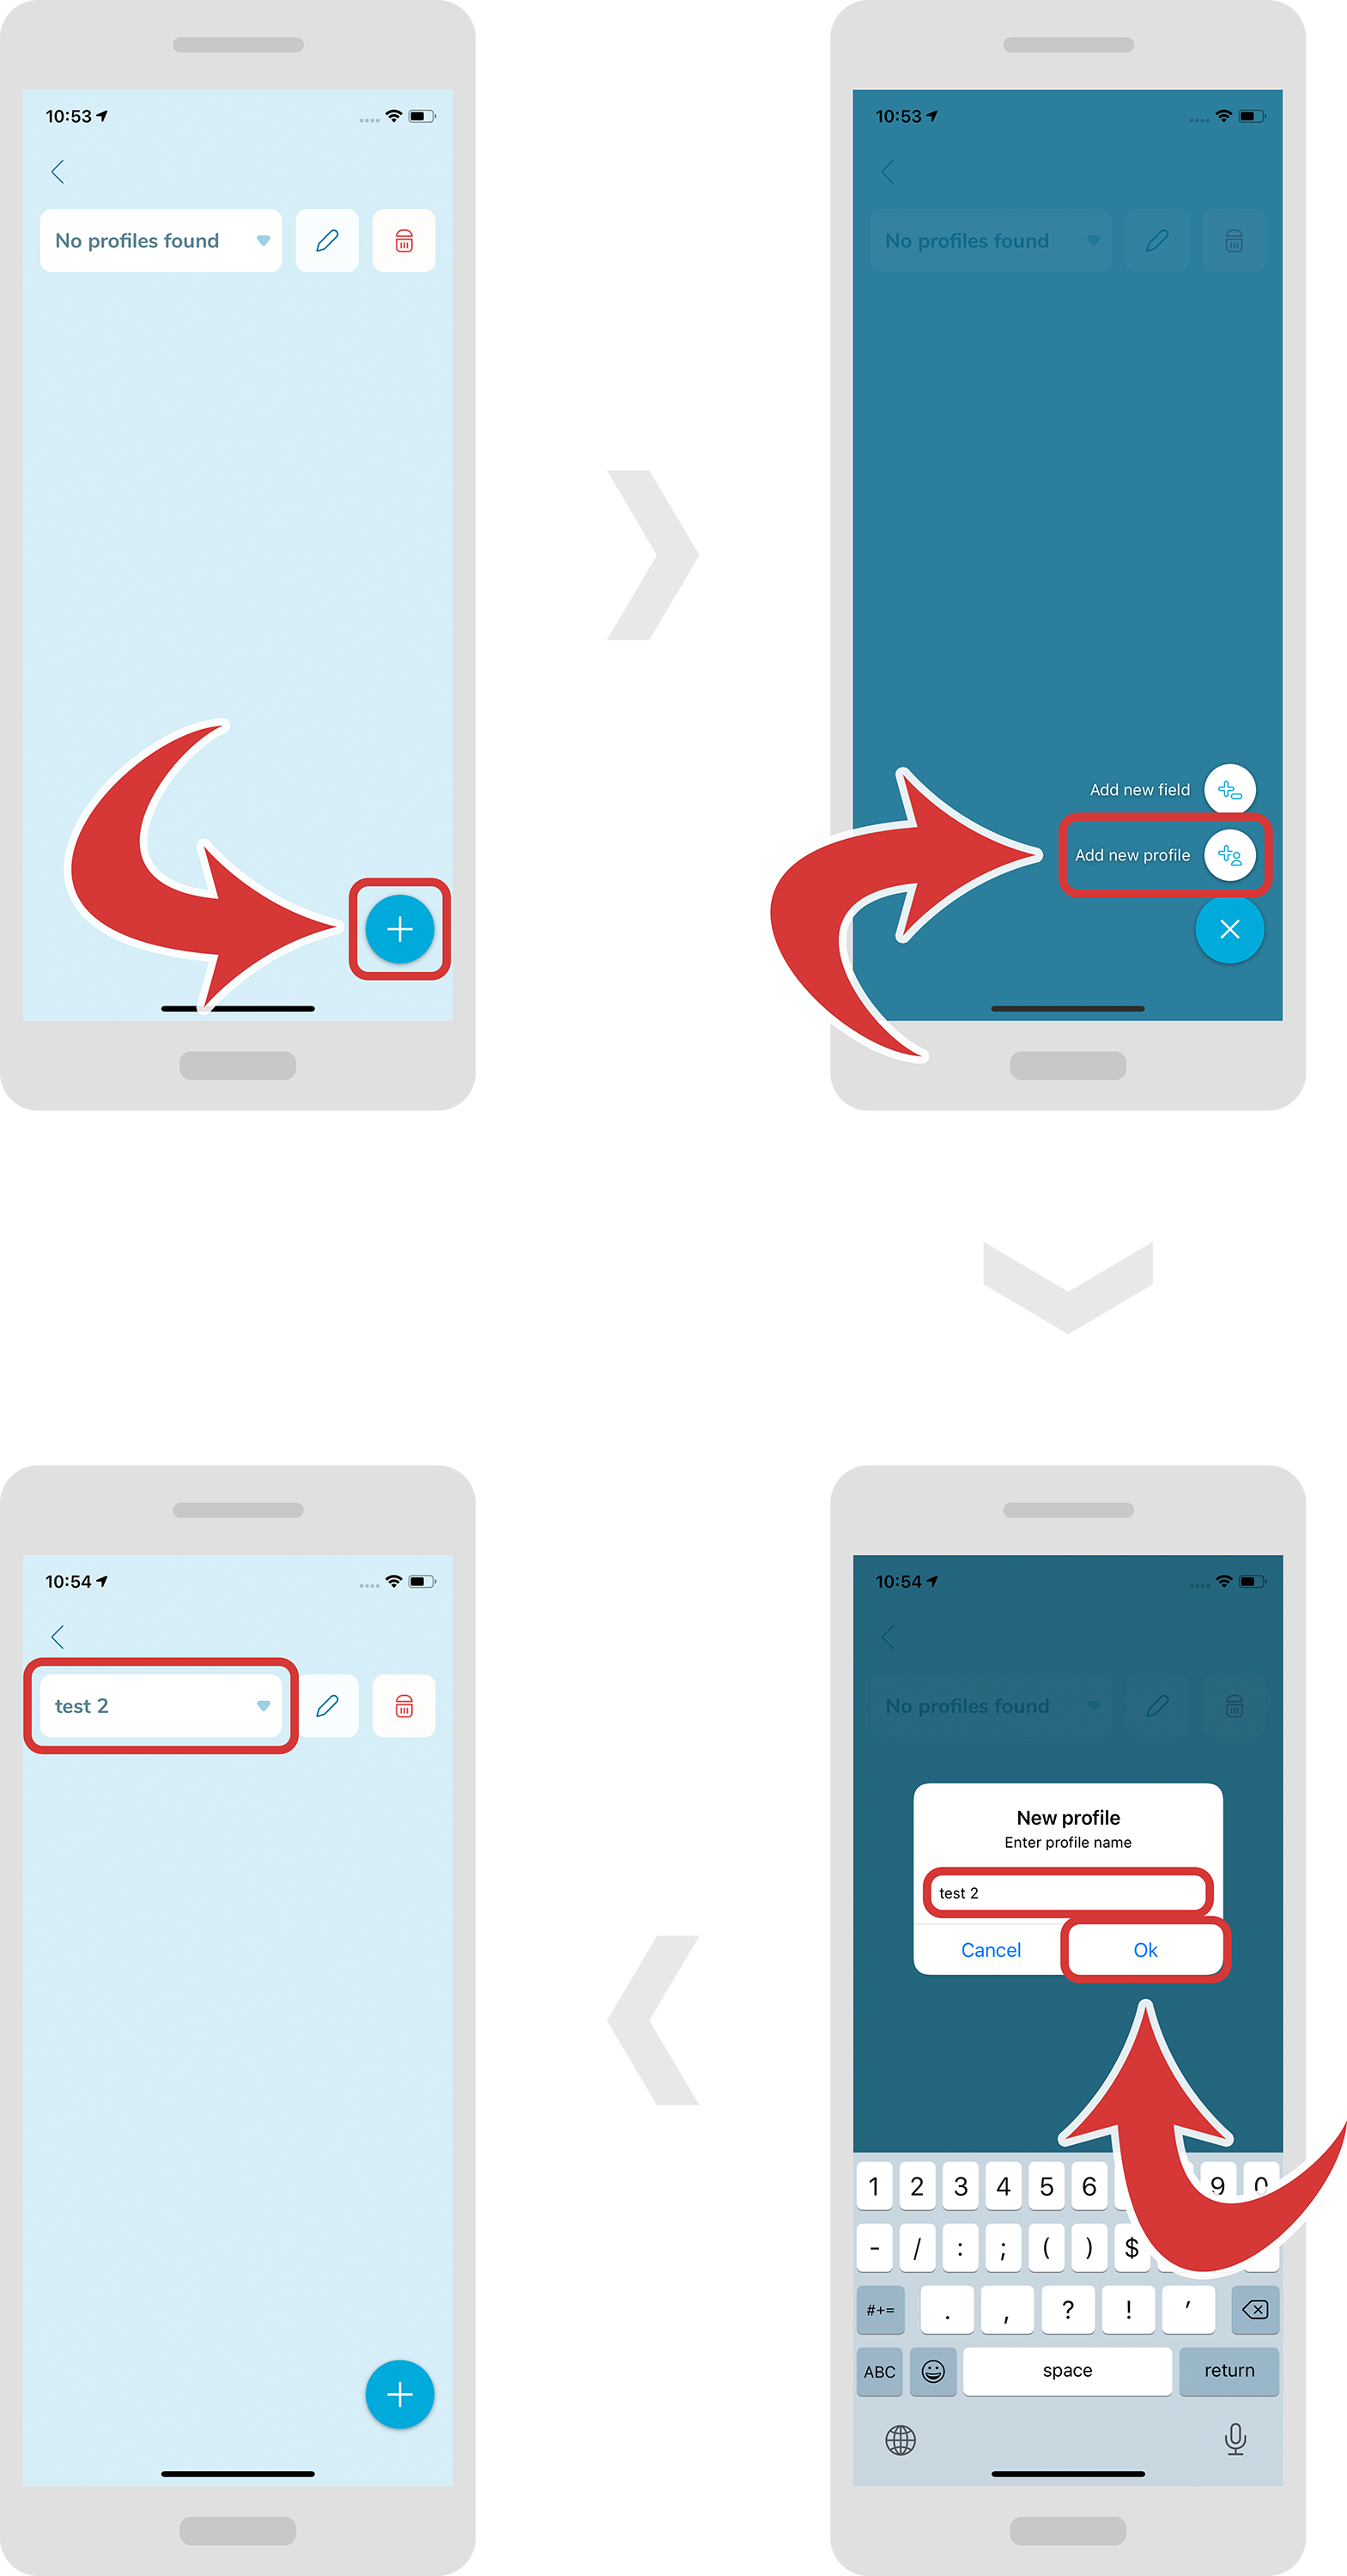
At the top you can select your profile from the drop down menu. As a default there will be no profiles to select.
Create/Edit/Delete profile
-
In order to create a new profile, press the “+” button at the bottom right and select “Add new profile”. A new window should pop up where you will be able to put your profile name.
-
Press the “Ok” button to confirm.
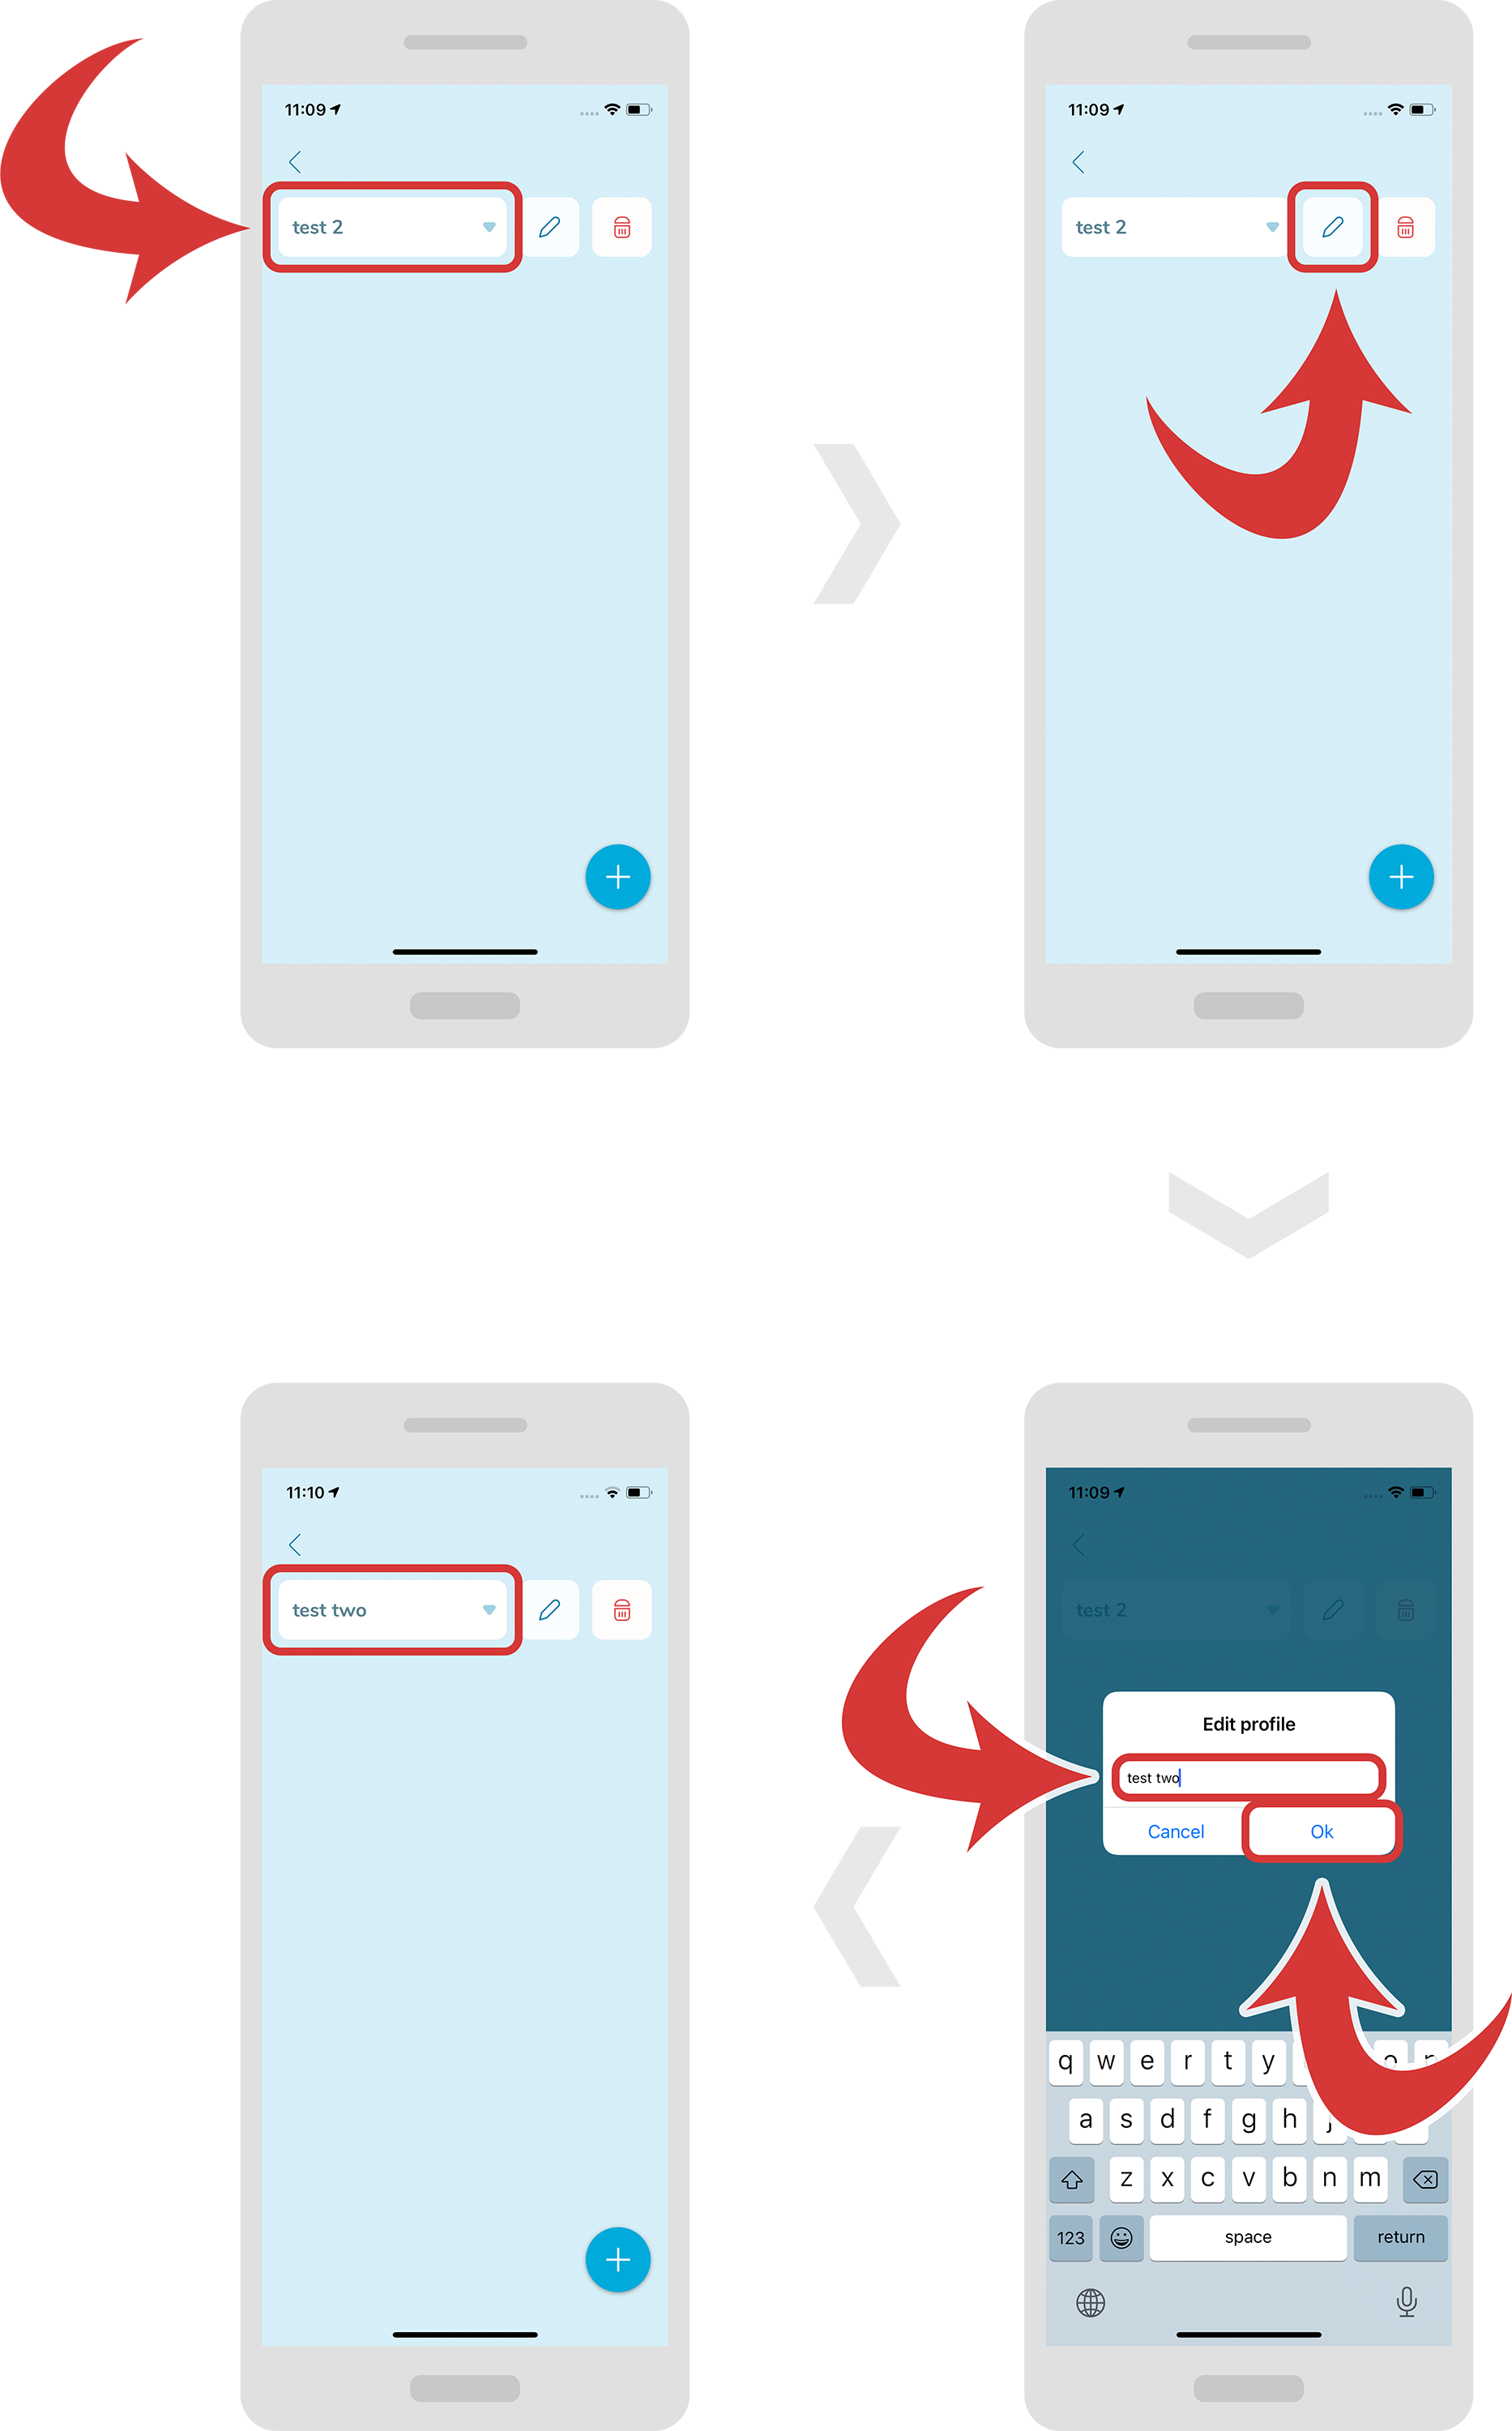
- In order to edit a profile, first select it from the drop down menu.
- Now, press the “pencil” icon near the profile name. A new window should pop up.
- On this new window specify a new profile name and press the “Ok” button.
-
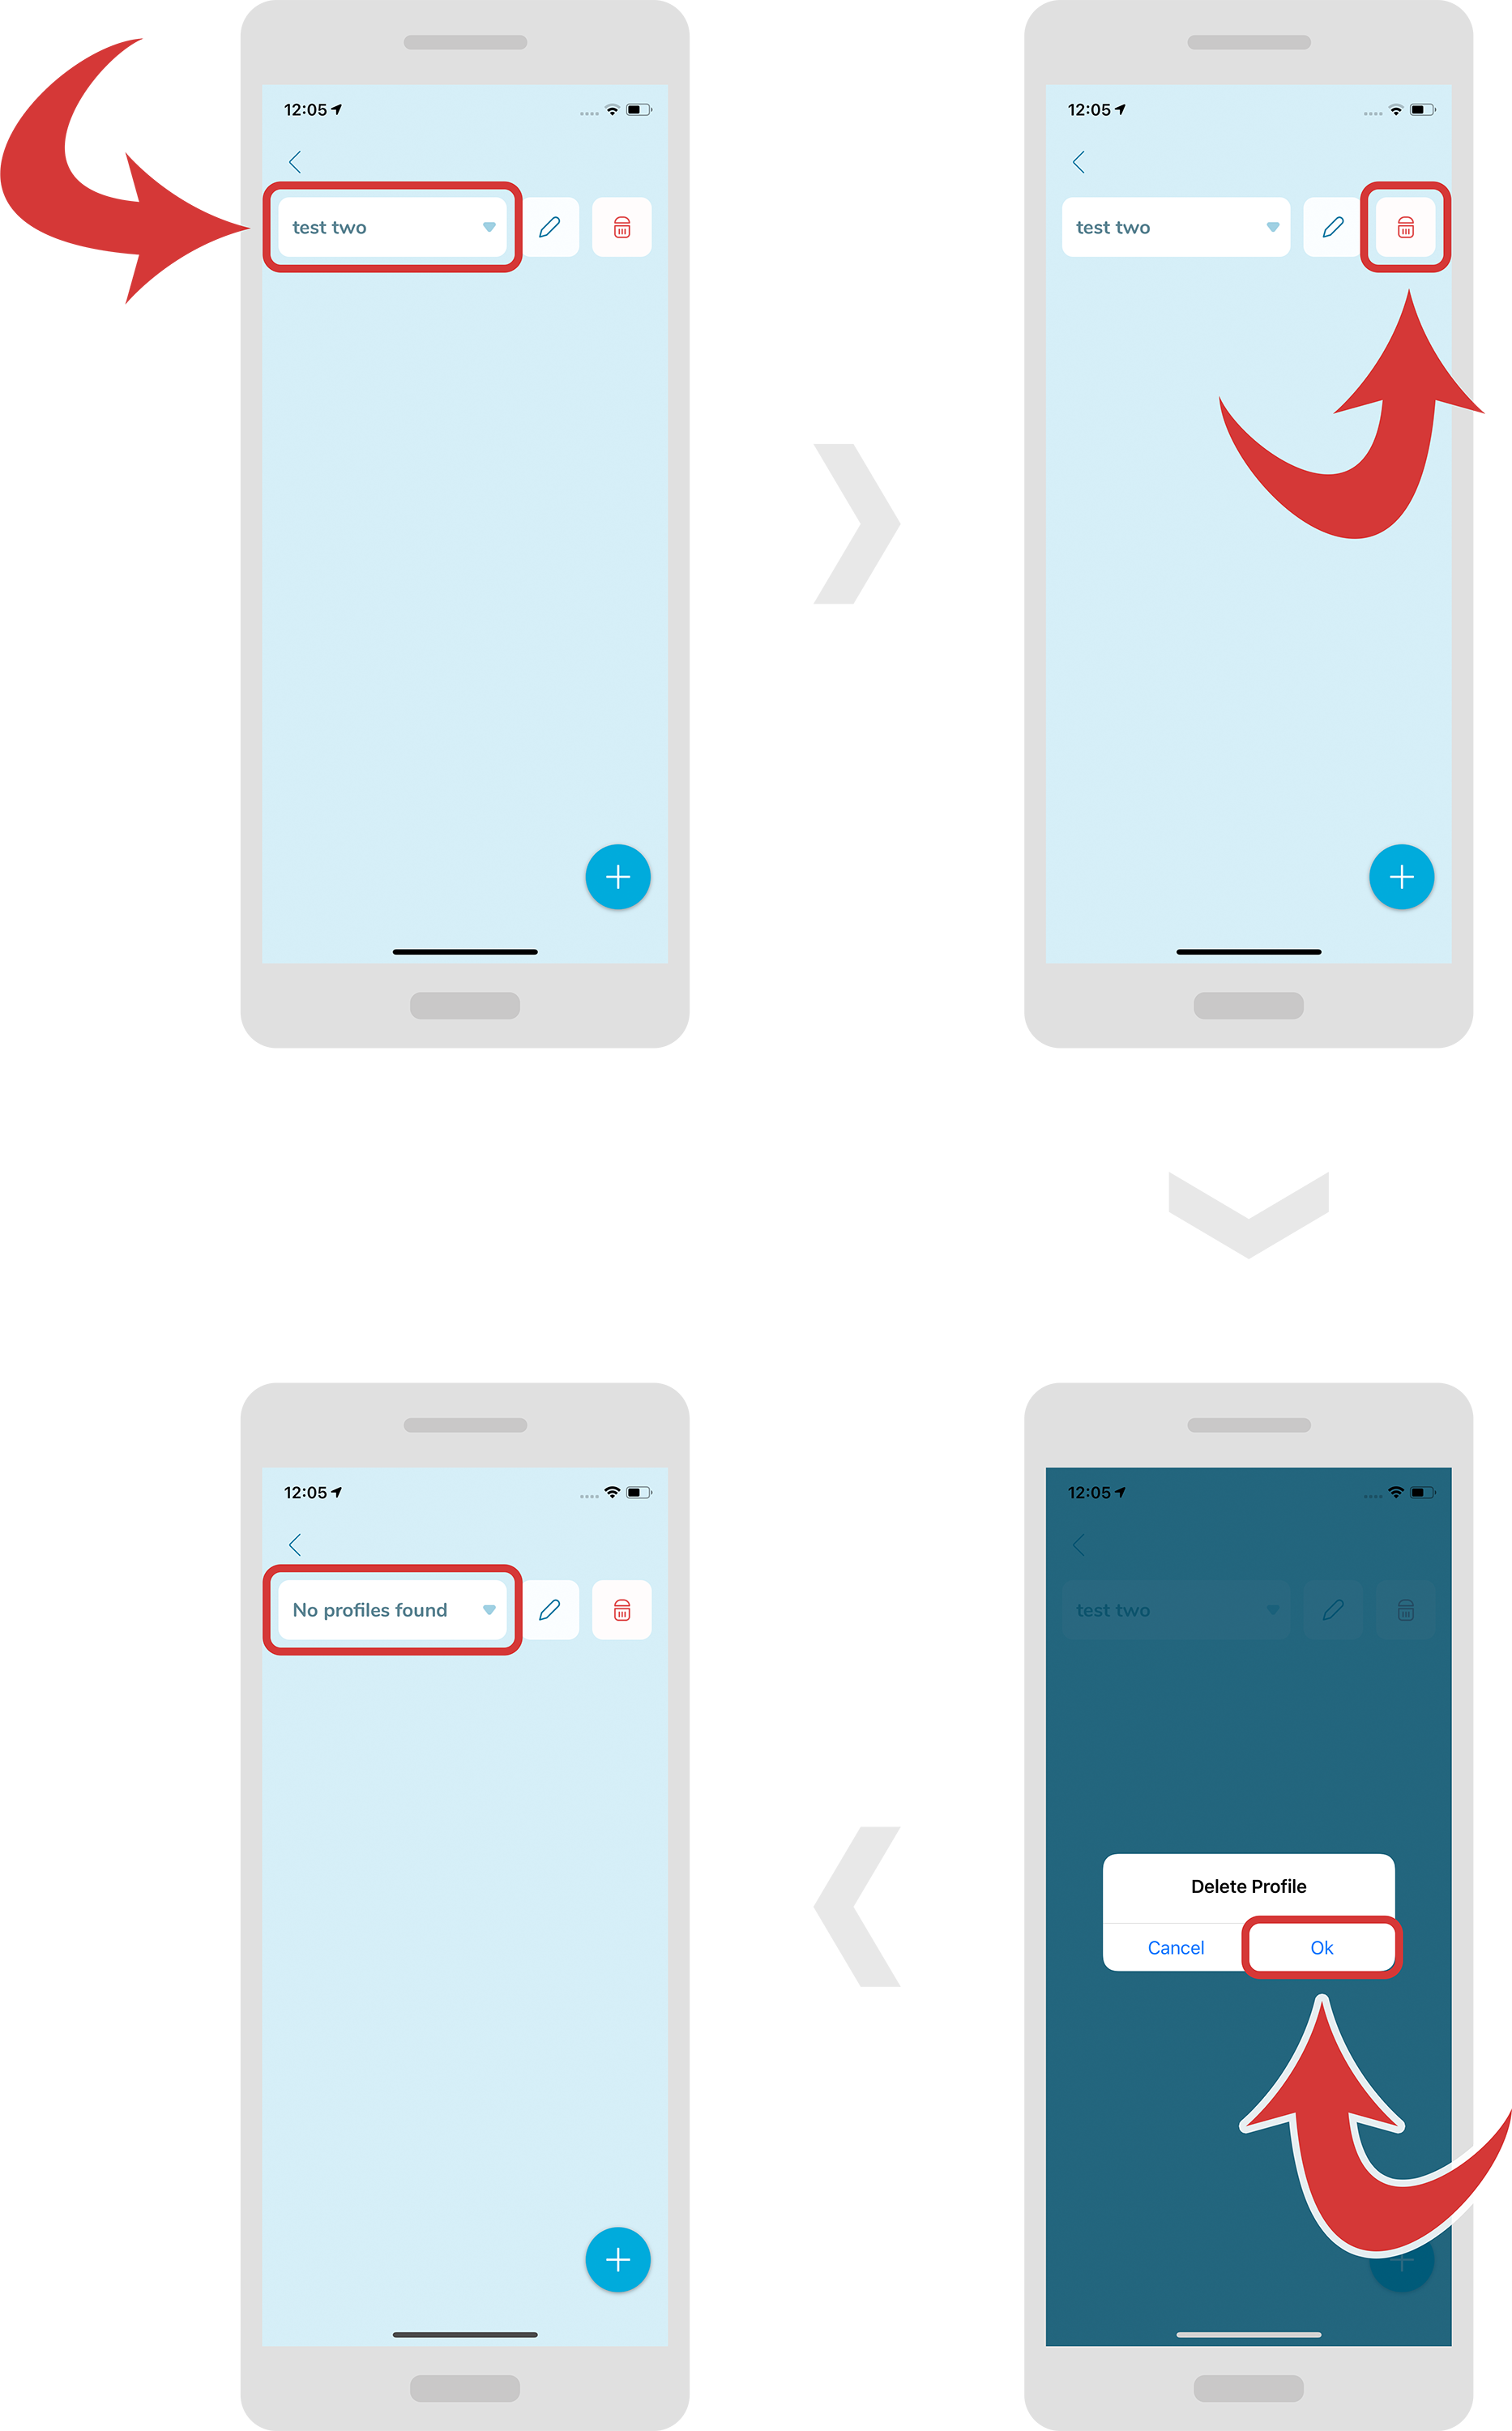
In order to delete a profile, first select it from the drop down menu.
-
Now, press the “trashbin” icon near the profile name. A new window should pop up.
-
Press the “Ok” button to confirm deleting the profile.
Create/Edit/Delete field
-
In order to create a new field, first make sure you have selected the right profile.
-
Now, press the “+” button at the bottom right and select “Add new field”. A new window should pop up where you will be able to put your field name and default field value.
-
Press the “Ok” button to confirm.

-
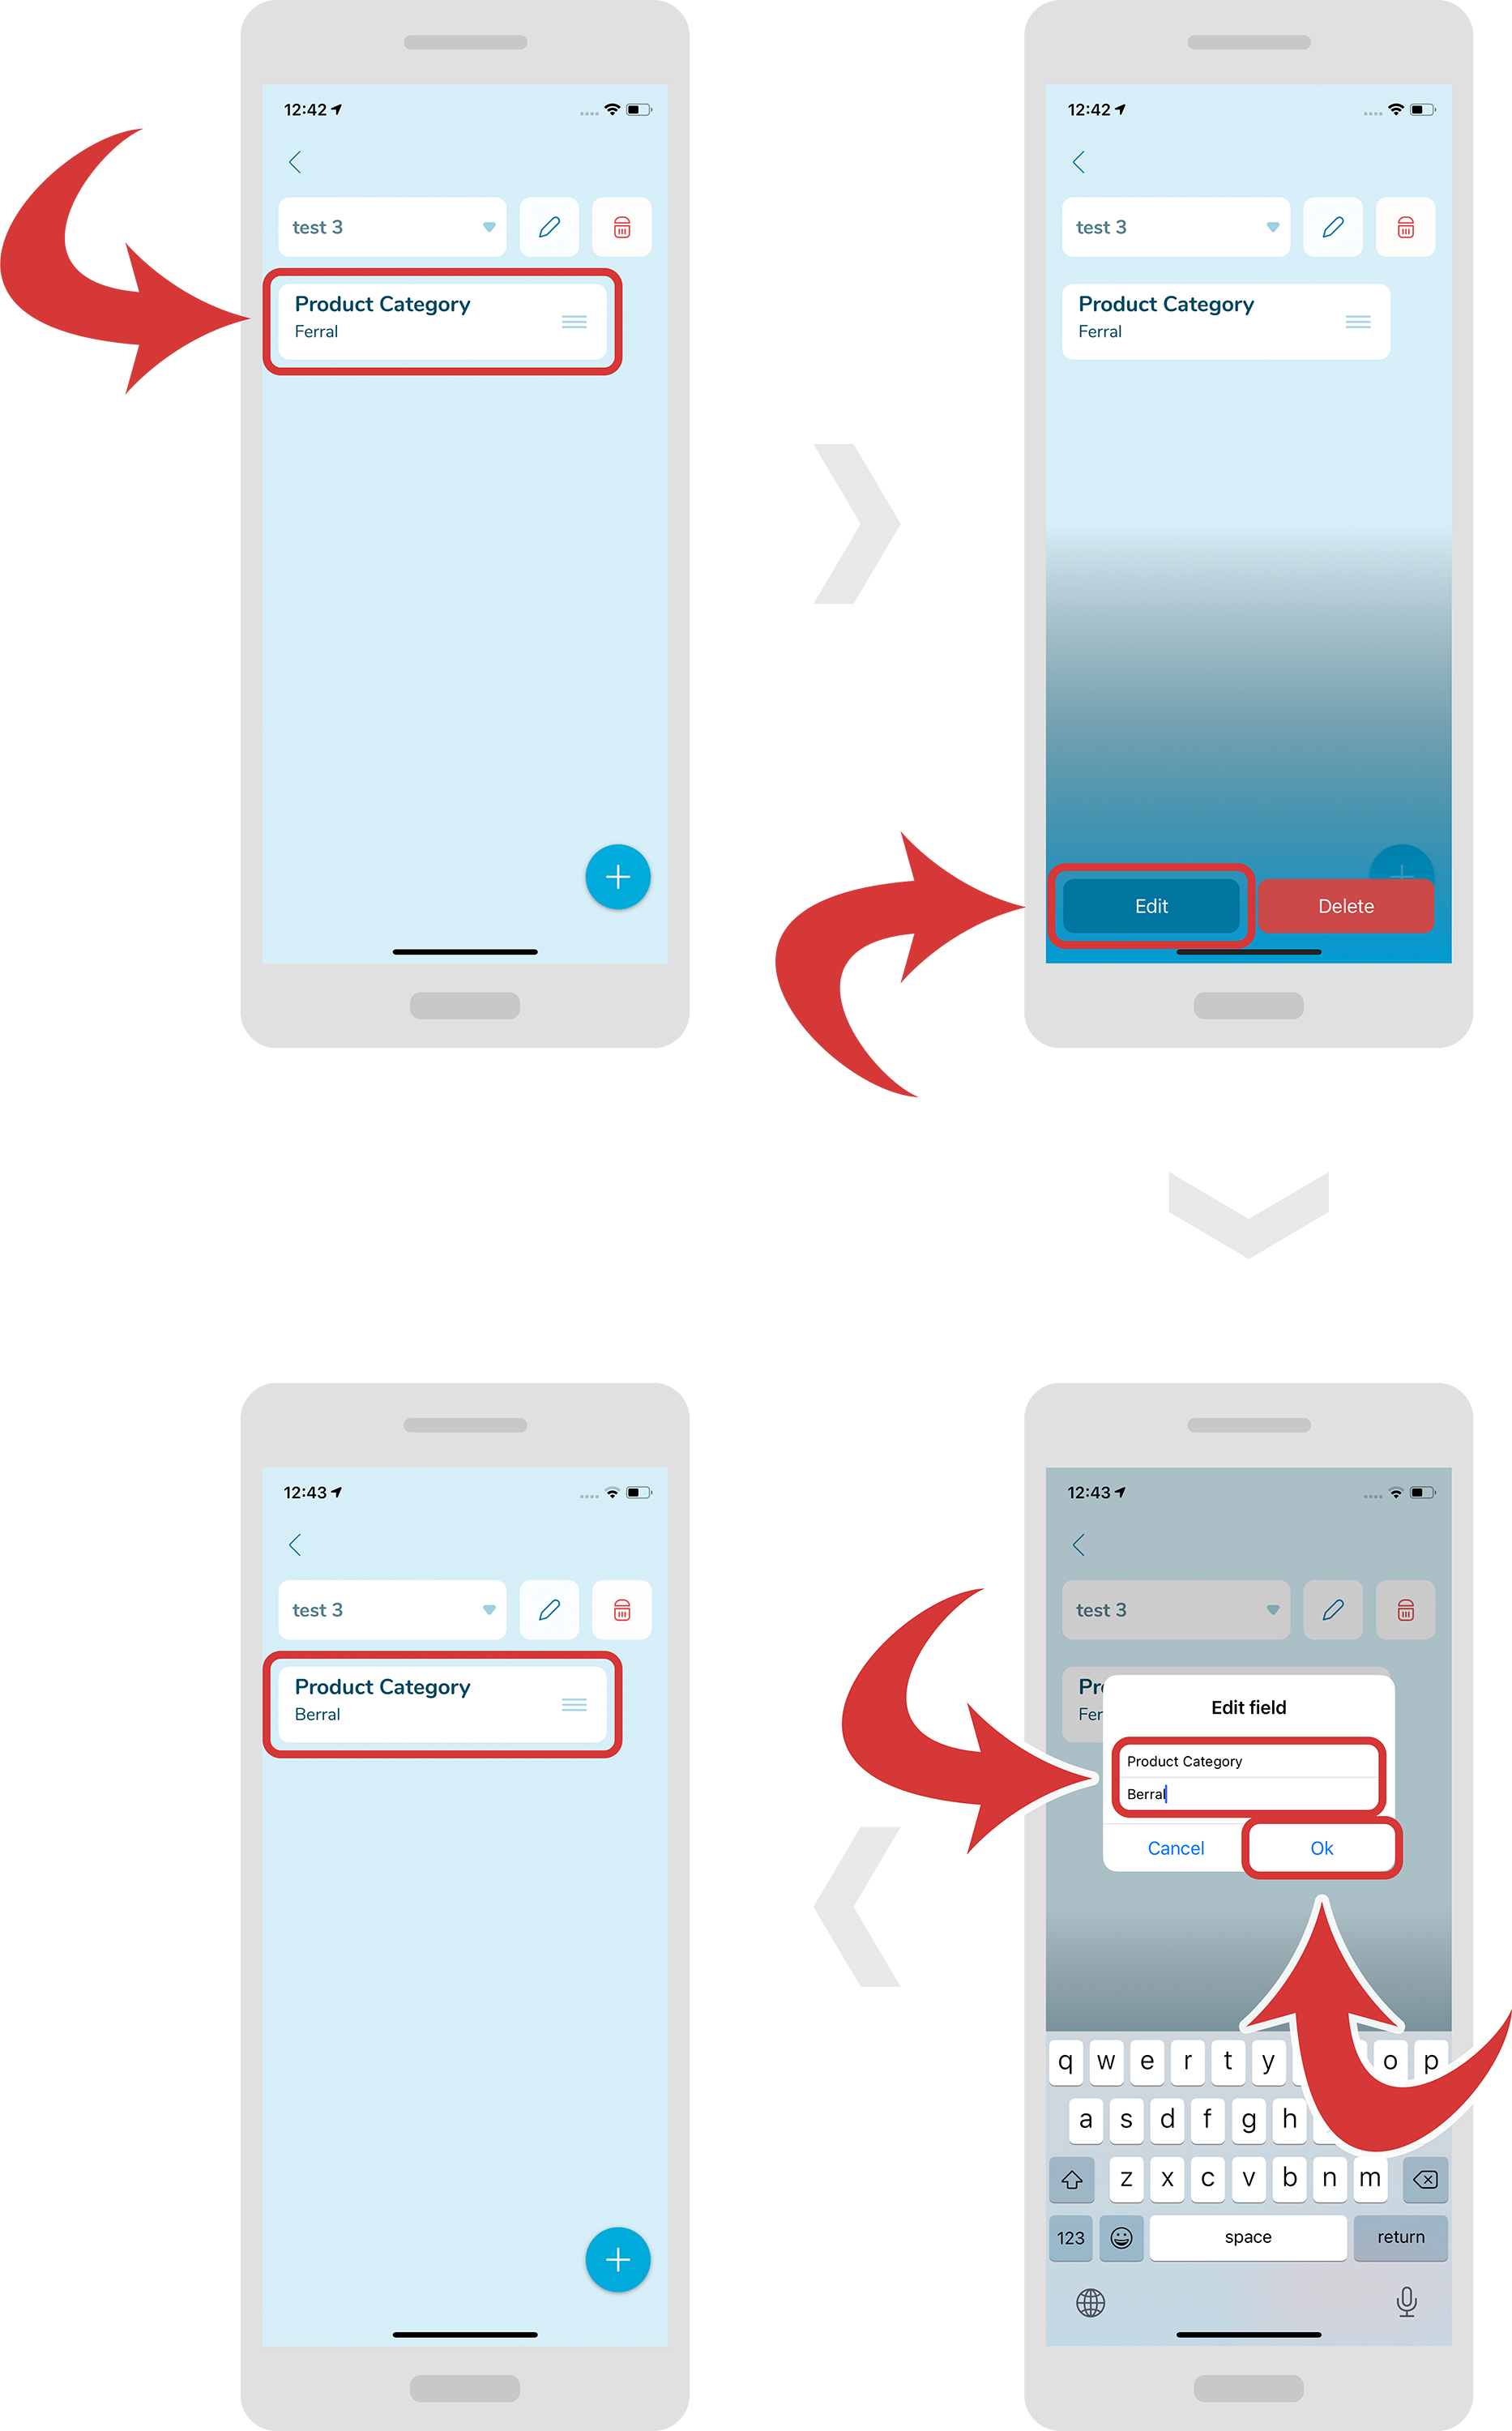
In order to edit a field, first tap it. A blue gradient should appear at the bottom with 2 buttons.
-
Press the “Edit” button. A new window should appear.
-
On this window, type your changes and press the “Ok” button.
-
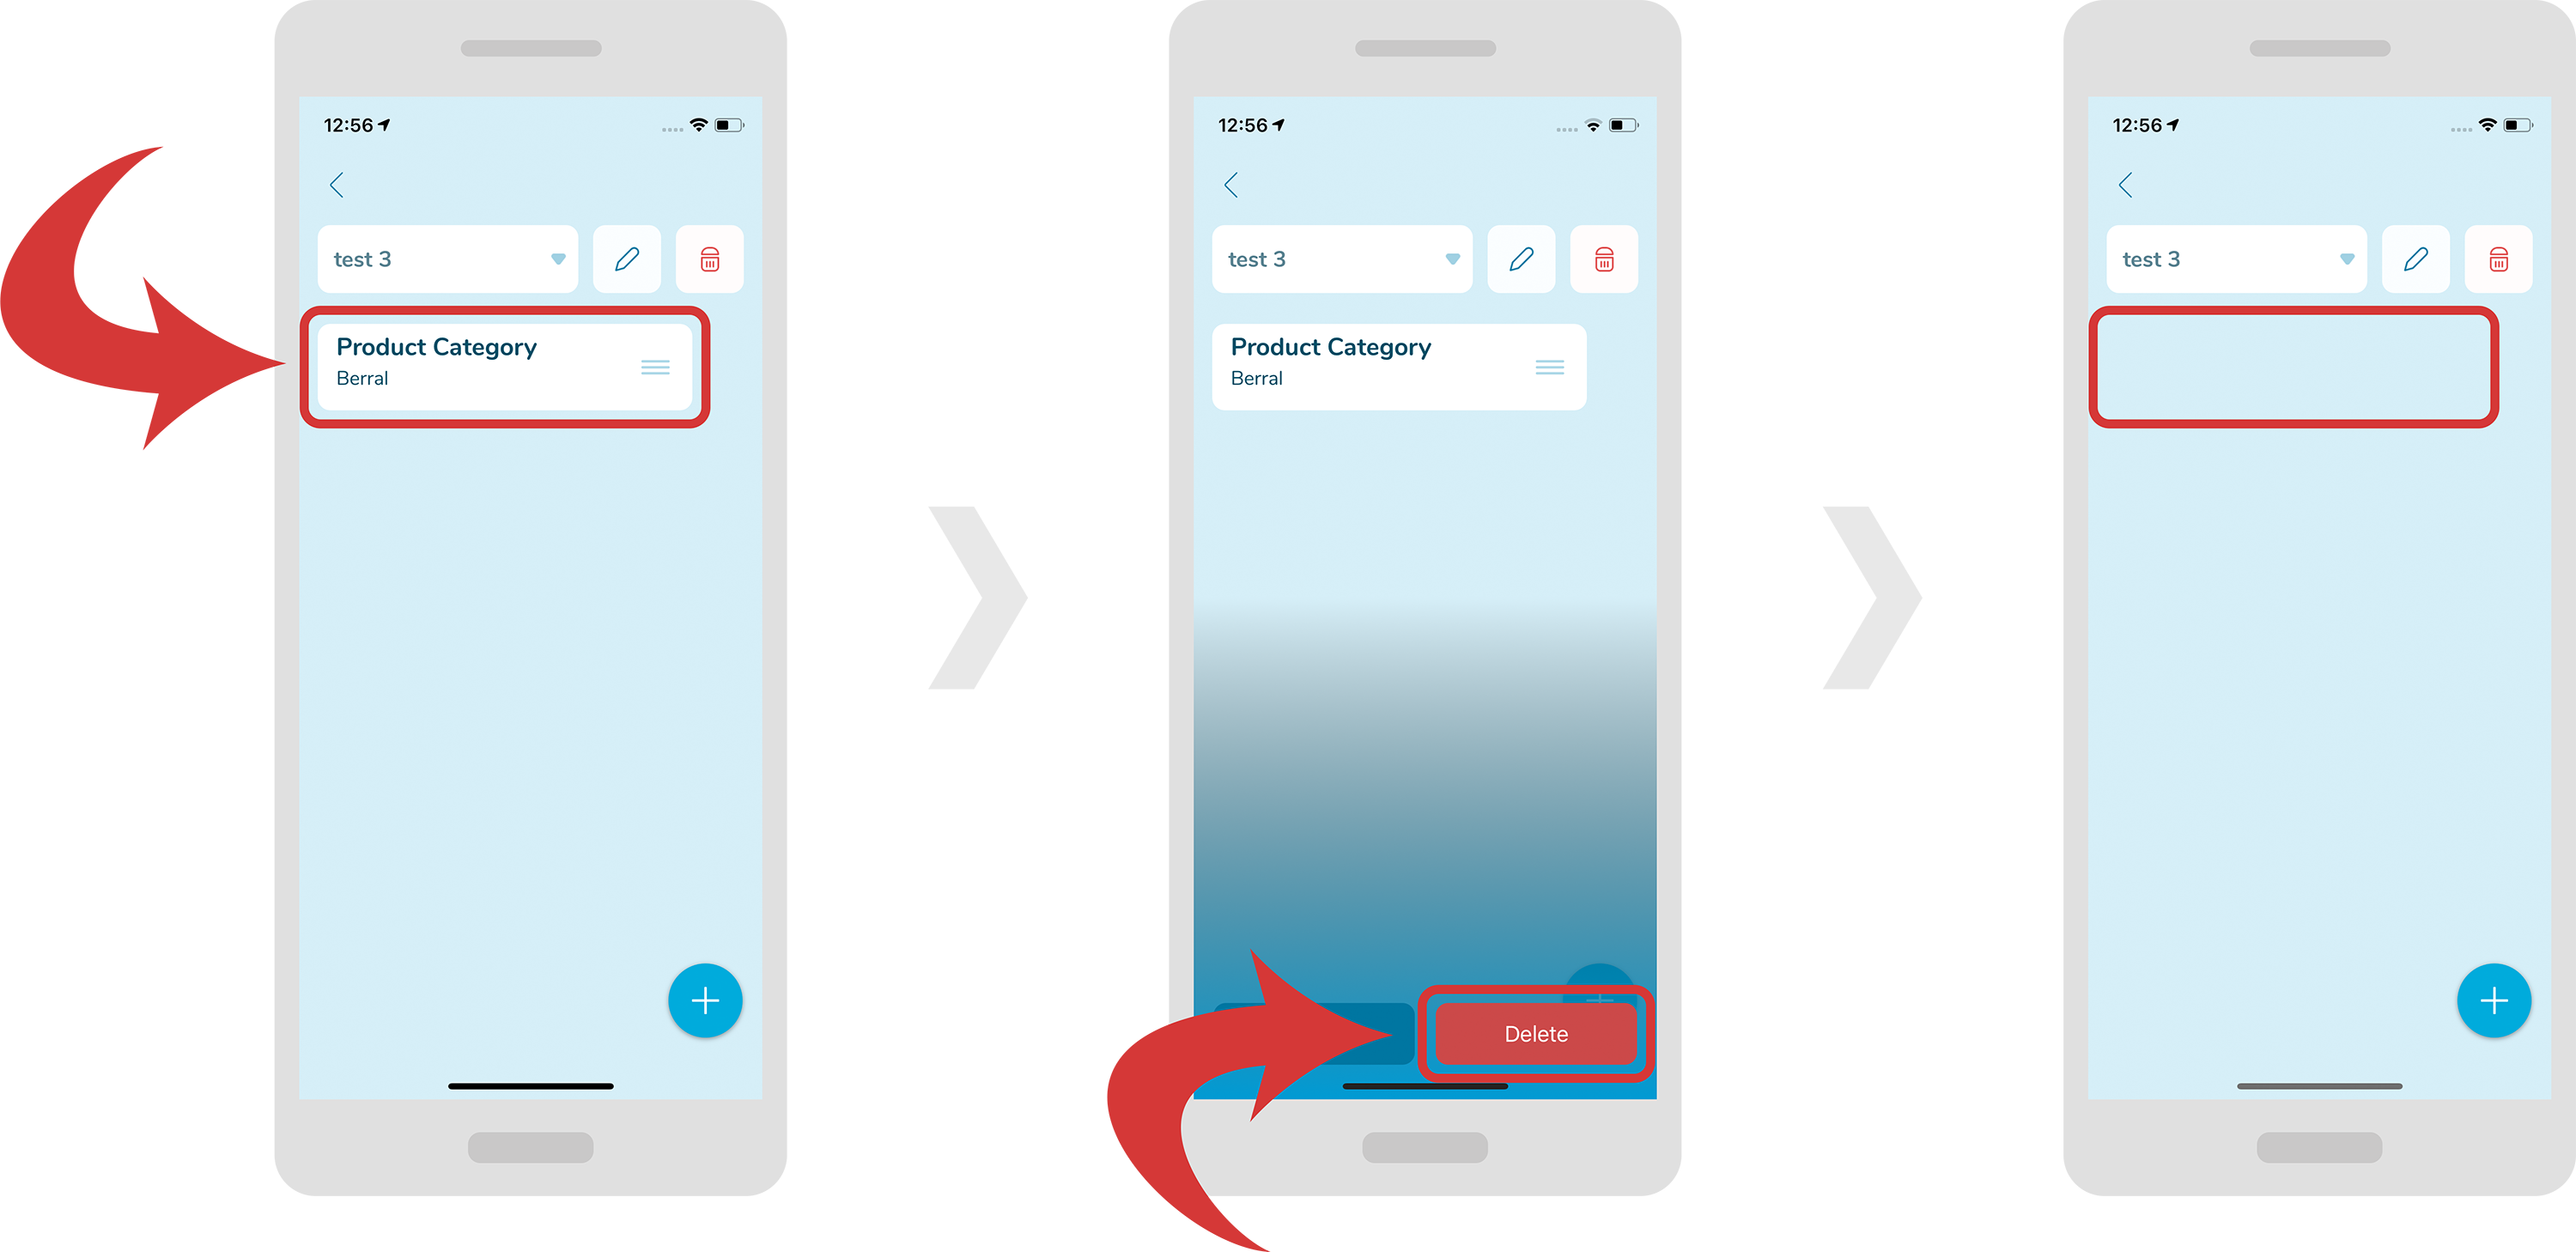
In order to delete a field, first tap it. A blue gradient should appear at the bottom with 2 buttons.
-
Press the “Delete” button.
-
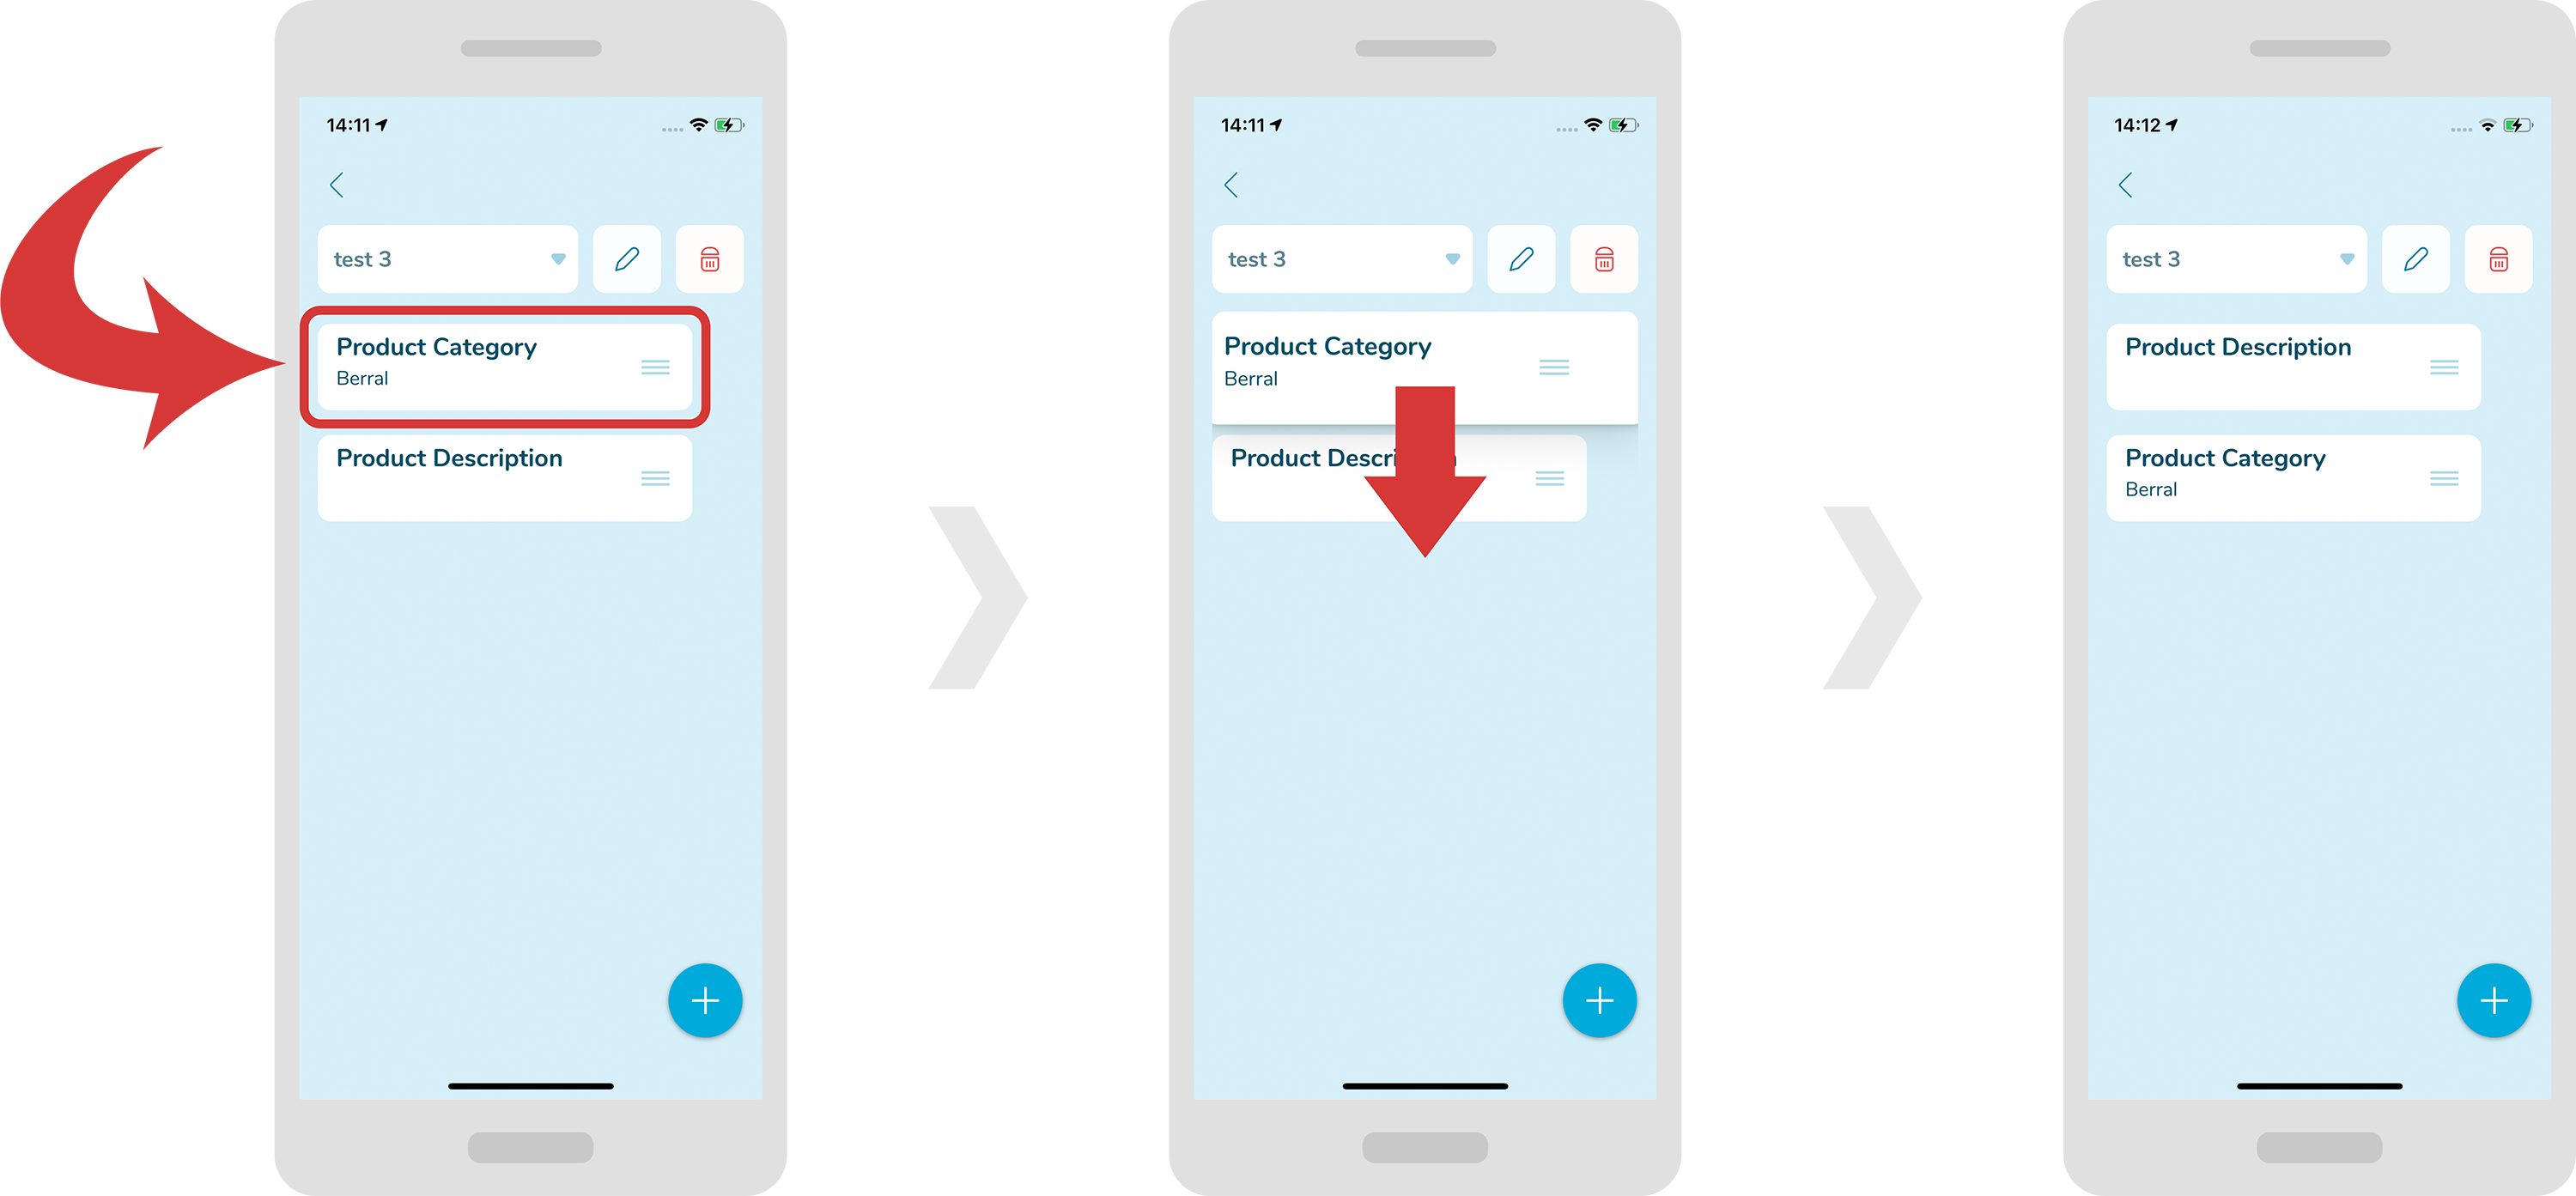
In order to change the order of a field, first hold the field you would like to move. After a moment it will become bigger.
-
Now drag it to your desired position and release. The field boxes should change their order.
Categories
History
In order to see the history of the readings, press on the “3 dots” icon on the top right.
A drop-down menu will appear where you will be able to select “Scan History”.

In order to access details of a specific reading, just tap any of the rows. You will see a new page with detailed information.
You can also access the graph by pressing the “View Graph” button.

In order to clear the readings, press the “Clear” button at the bottom. A new window should pop up.
On this new window press the “Yes” button.

In order to change logistical data, press the “Link with External Info” button. Now you can scan the barcode or enter the information manually.
In order to scan the barcode, just place your phone in front of the barcode. Once it is scanned you should hear the “beep” sound and the top field should be replaced with the information.
In order to enter the information manually, press the “hand” icon that is located at top right. Now press the top field and insert you information.

Now select the “Pharma / Product Info” or “Tracking / Logistics Info” labels, depending where you would like to insert the information. You can then change the information at the top field and change the second field at the bottom.
Once it is done, press the “Link information” button. Put you logger under your mobile phone. Once it is completed you will see a message at the bottom “Operation successfully completed“.

If you would like to activate the light on your mobile phone, press the “light” icon at the top left.
In order to deactivate it, just press the “light” icon again.

In order to download the calibration certificate, press on the “certificate” icon on the top right.
You will find the certificate in the “My files” app on your smartphone inside a “Download history” or “Documents” folder. You can then send it to others or upload it to your computer.

In order to read temperature, press on the “3 dots” icon on the top right.
A drop-down menu will appear where you will be able to select “Read temperature”.
Place the logger near your smartphone to complete the operation.

Categories
AAR
In order to recover AAR, press on the “3 dots” icon on the top right.
- A drop-down menu will appear where you will be able to select “Recover AAR”.

Place the logger near your smartphone to complete the operation.
After a successful operation you will see the message at the bottom saying “AAR recovery completed“.

Categories
Settings
In order to access the settings, press on the “3 dots” icon on the top right.
A drop-down menu will appear where you will be able to select “Settings” or “WiFi settings”.

 Inside “Settings” you will be able to adjust various options, for example set language, temperature unit, bluConsole account and auto upload.
Under “Others” section you will be able to select from 2 types of delayed start of recording: “delay duration” (the recording starts after “x” number of minutes) or “date and time” (the recording starts at a specific date and time).
Based on your choice the appropriate field will appear while starting a new recording.
Inside “User interface” section you will be able to select a duration of message display (for how long the information messages will appear), message font size and mode of numbers input (you can select numbers using a “spinner” feature or manually).
 Inside “WiFi Settings” you will be able to select your WiFi network.
Categories
Profiles
In order to create or edit profiles press on the “labels” icon on the top right.

-
At the top you can select your profile from the drop-down menu. There are 3 default profiles available: “Default”, “Basic” and “Shipping”.

Default

Basic

Shipping

Add/Edit/Delete profile
In order to create a new profile, press the “+” icon at the top right. A new window will pop up where you will be able to put your profile name.
Click the “OK” text to create the profile.

In order to make the changes to the profile itself, press the “3 dots” icon at the top right. A new drop-down menu will pop up where you can select from: “Edit profile name”, “Delete profile” and “Share profile”.

In order to edit the profile name, select “Edit profile name” from the drop-down menu. A new window will pop up where you can type your new profile name.
Press the “OK” text to make the changes.

In order to delete the profile, select “Delete profile” from the drop-down menu. A new window will pop up asking if you are sure about deleting the profile.
Press the “YES” text to delete the profile.

Add/Edit/Delete profile field
In order to define a new profile field, press the “+” icon at the right menu. A new window will pop up where you will be able to choose a “Predefined field” or a “Custom field” from a drop-down menu.

With a “Predefined field” you can select from the list of fields already created for you. Field default value is the value that will be automatically pre-filled for you for the selected field when creating a new recording.
Click the “OK” text to create the profile.

With a “Custom field” you can create a custom field name, as oppose to a “Predefined field” where you could only select from the list of preloaded field names.
Press the “OK” text to create the profile.

In order to edit a profile field, press the “pencil” icon at the right menu. A new window will pop up where you will be able to make appropriate changes.
Press the “OK” text to save the changes.

In order to delete a profile field, press the “dustbin” icon at the right menu. A new window will pop up asking you if you are sure about deleting the specific field.
Press the “YES” text to remove the field.

Other
- In order to share the profile, select “Share profile” from the drop-down menu. You will be able to share your profile via email, Bluetooth or text messages.

In order to save the changes press the “disc” icon at the top.

Categories
Know Your Numbers
If you would like to see to which loggers the hub is currently connected to, scroll down to the section “Buffer data” that is located on the left. The loggers IDs are located to the right from the time.

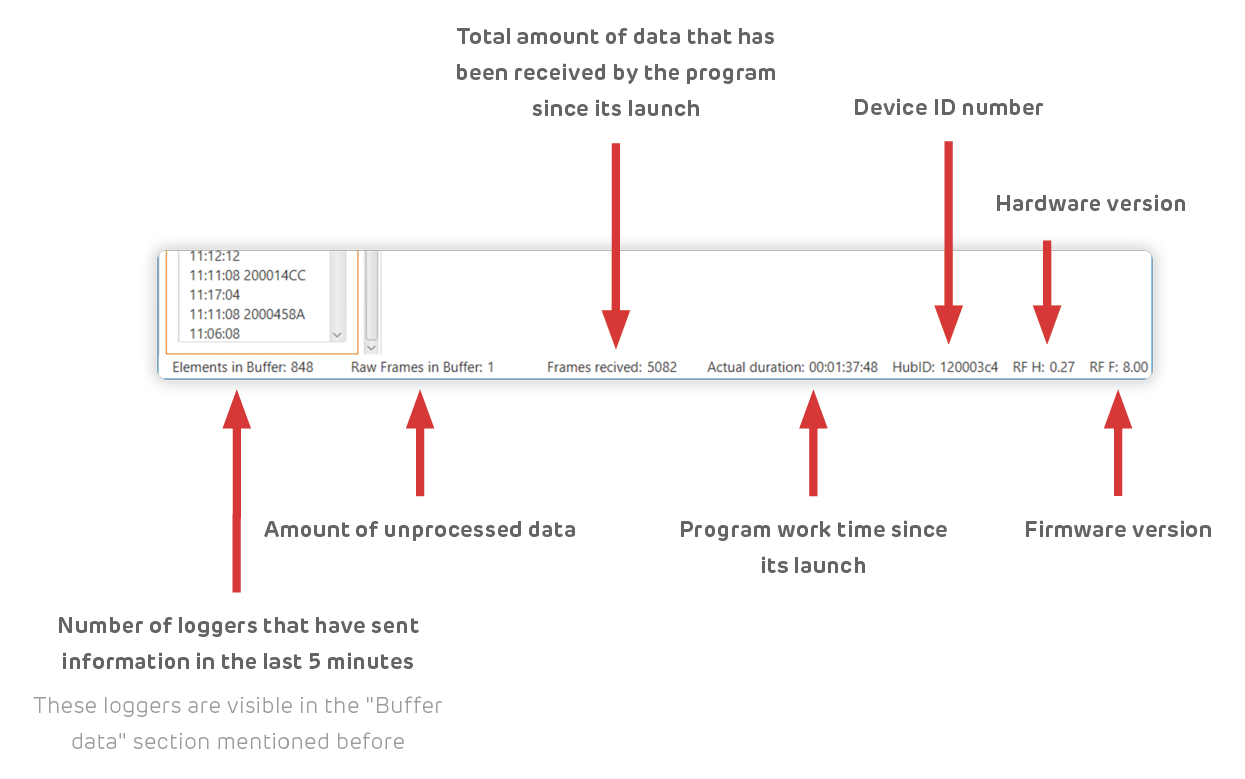
At the bottom bar you will be able to see more data that you may find helpful. Here is a little explanation.
Categories
Import Loggers
In order to import the loggers from a CSV file, first you will have to create the CSV file in Microsoft Excel or other software that can export CSV files. In this example we are going to use Microsoft Excel.
Click “New” on the left tab menu and select a “Blank workbook”. In the first column insert the loggers IDs, one per cell.

Now click “File” from the top menu and select “Save as” on the left tab menu.
Click “Browse” and select the directory you would like to save your file to. Make sure to select a CSV format in the “Save as type” field.
Click the “Save” button.

Now go back to the bluRadio app, click on the “Import/Export” menu item at the top and select “Import loggers from CSV”.
An explorer window should pop up where you can select your file. Click the “Open” button.
Now the new loggers boxes should appear in the main section.

